Skip to content
Features

Everything it does, by topic.

A canvas you design on and then use, widgets bound to anything in Blender, pages that follow your mode, the tools of a design app, presets your whole team can share, and a picker for every rig.

01

The canvas

Two kinds of canvas

A blank board for your own control panel.

Flex Space is for control panels: operator buttons, scripts, sliders, toggles, labels and images, used from any workspace. Armature Picker is a canvas saved with an armature, for picking its bones while you pose. Both work the same way.

  • Set any area to Flex Space and click New
  • Each canvas is a data-block saved in your .blend file
  • The header selector switches, renames and keeps canvases
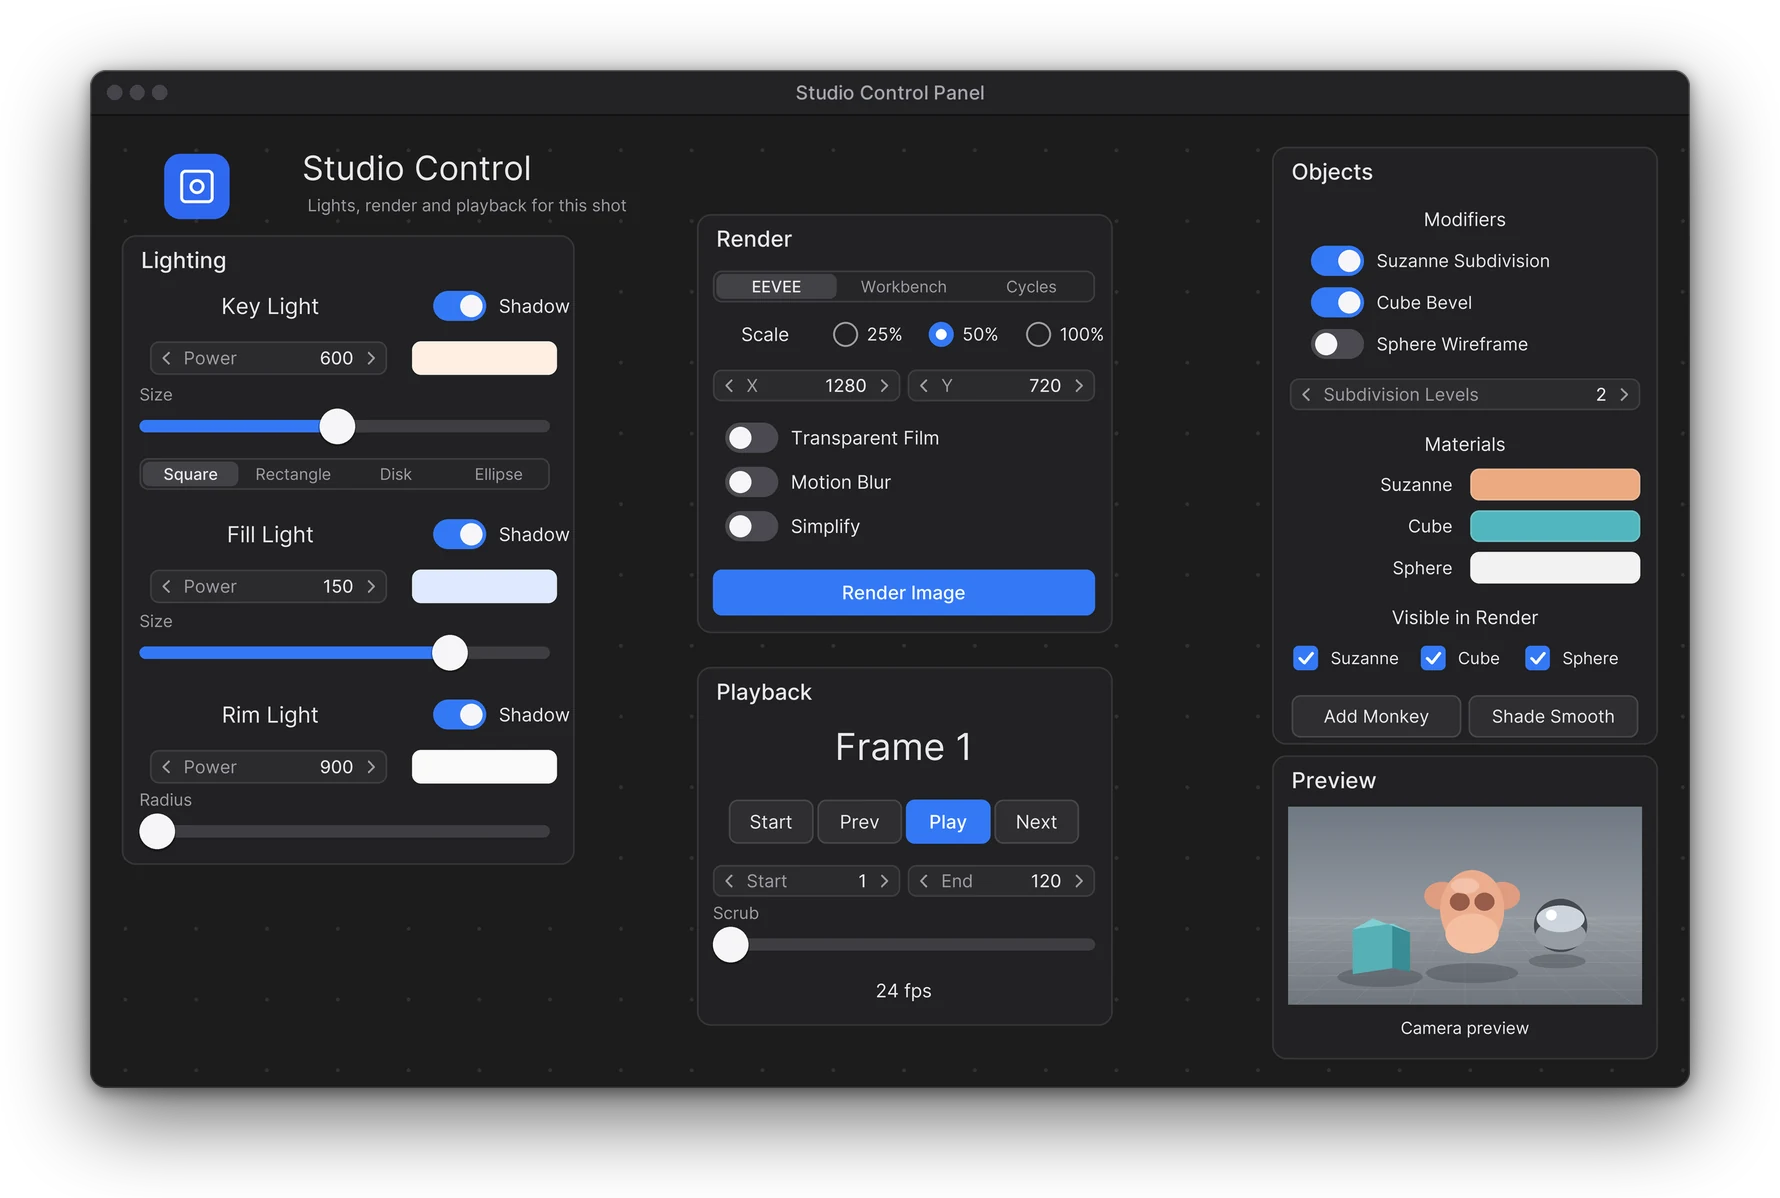
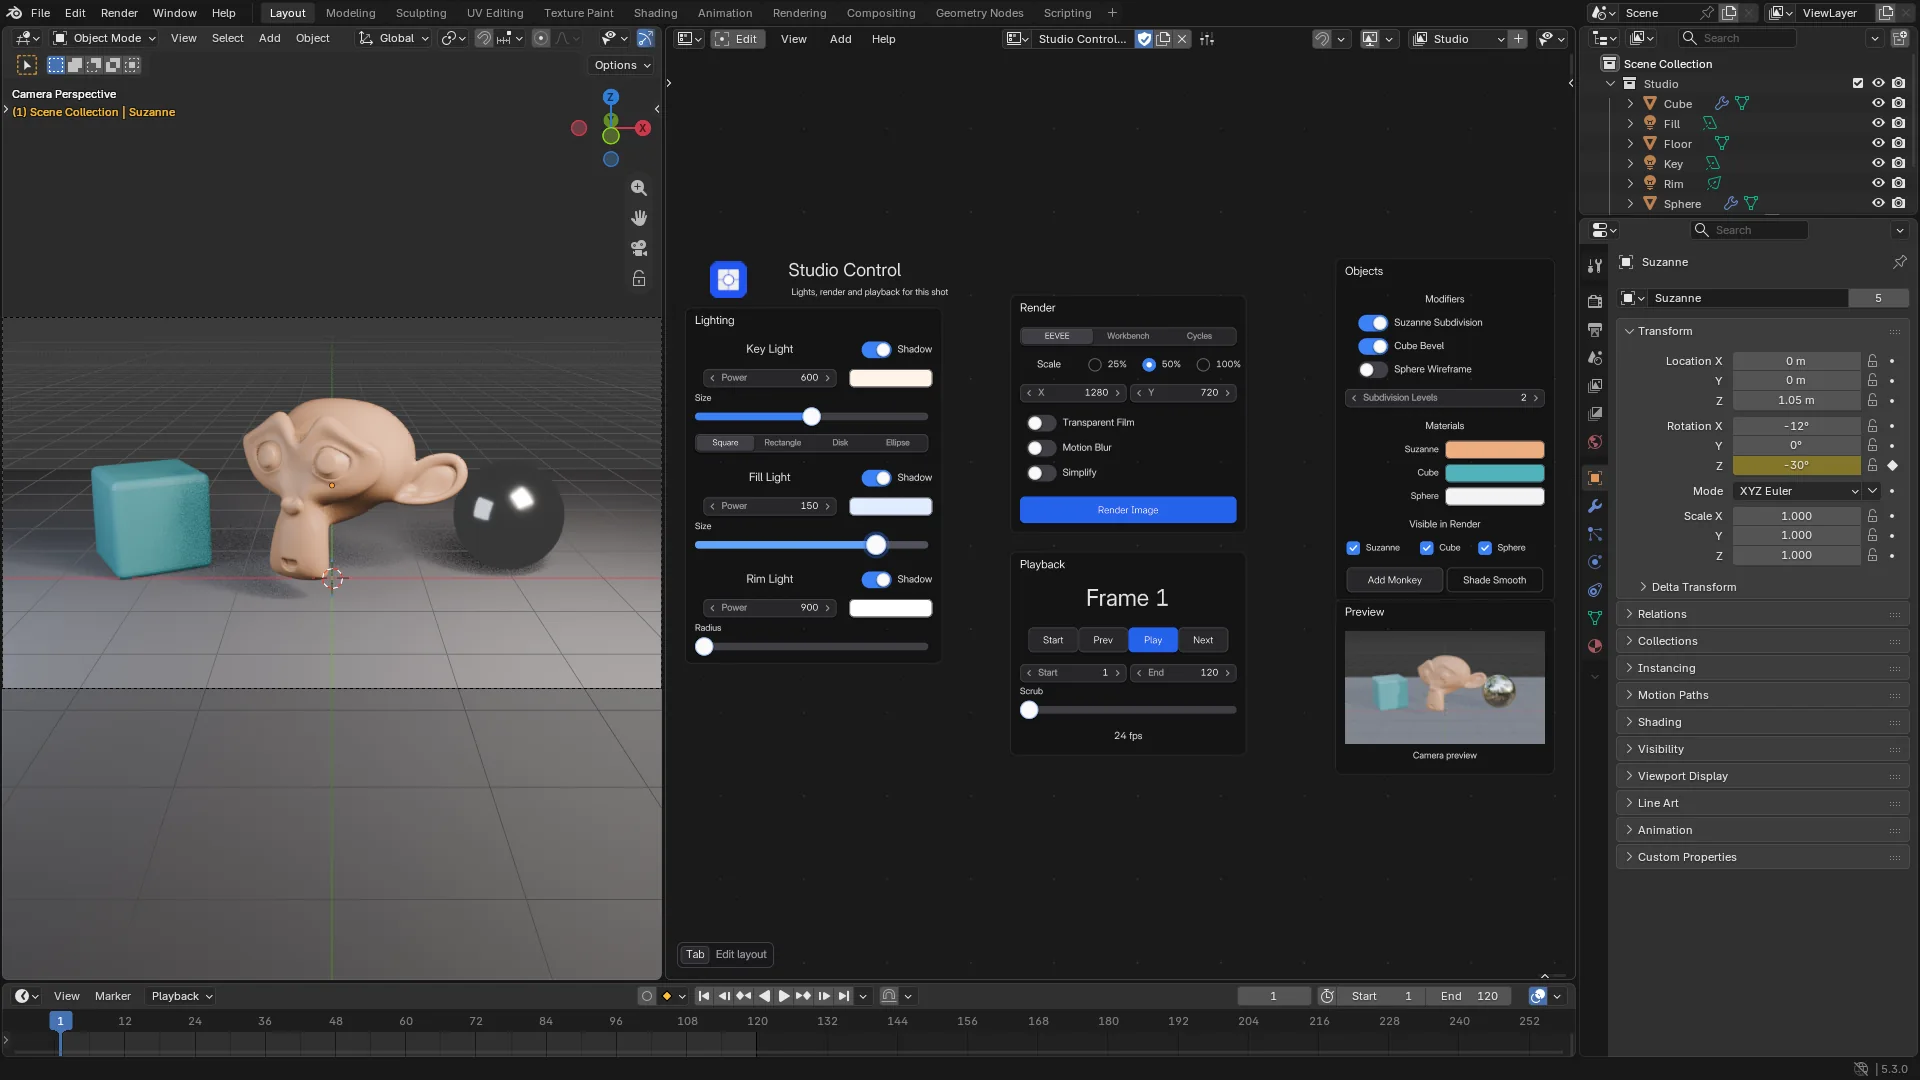
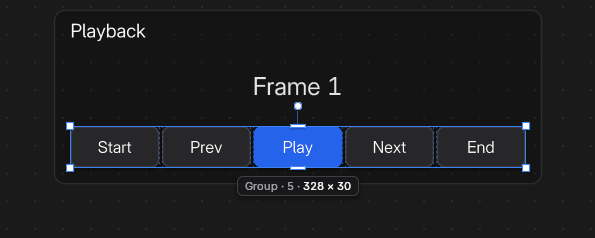
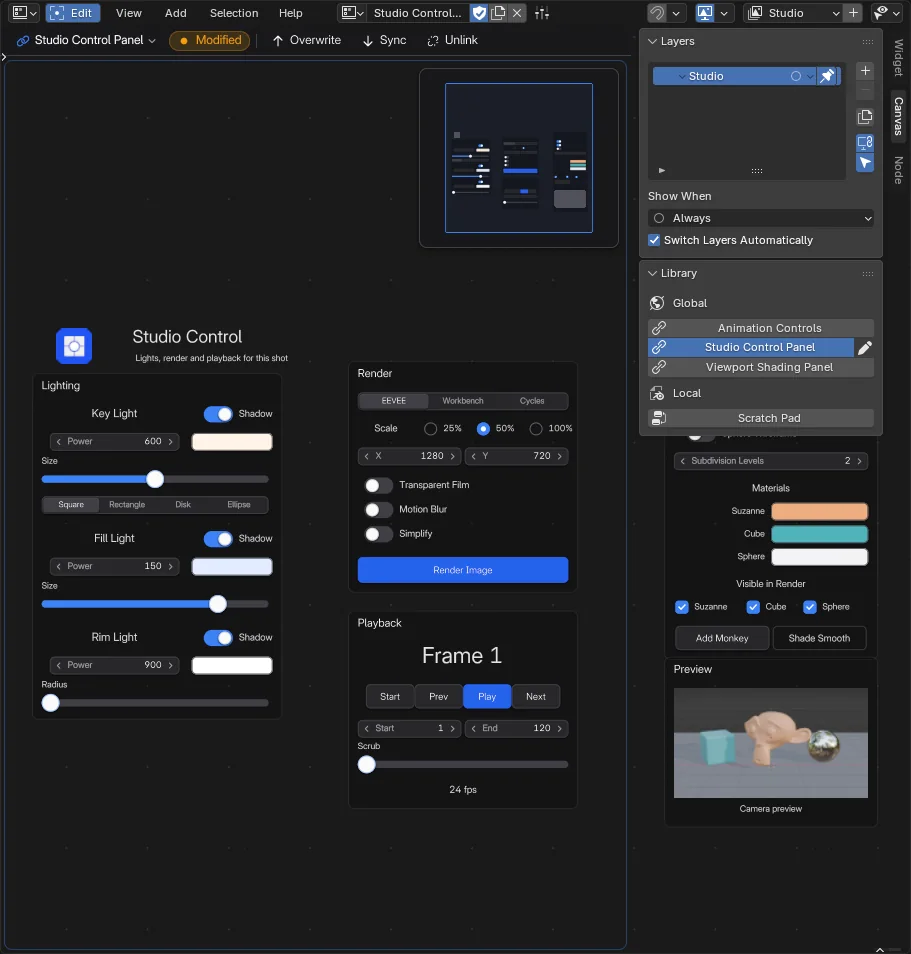
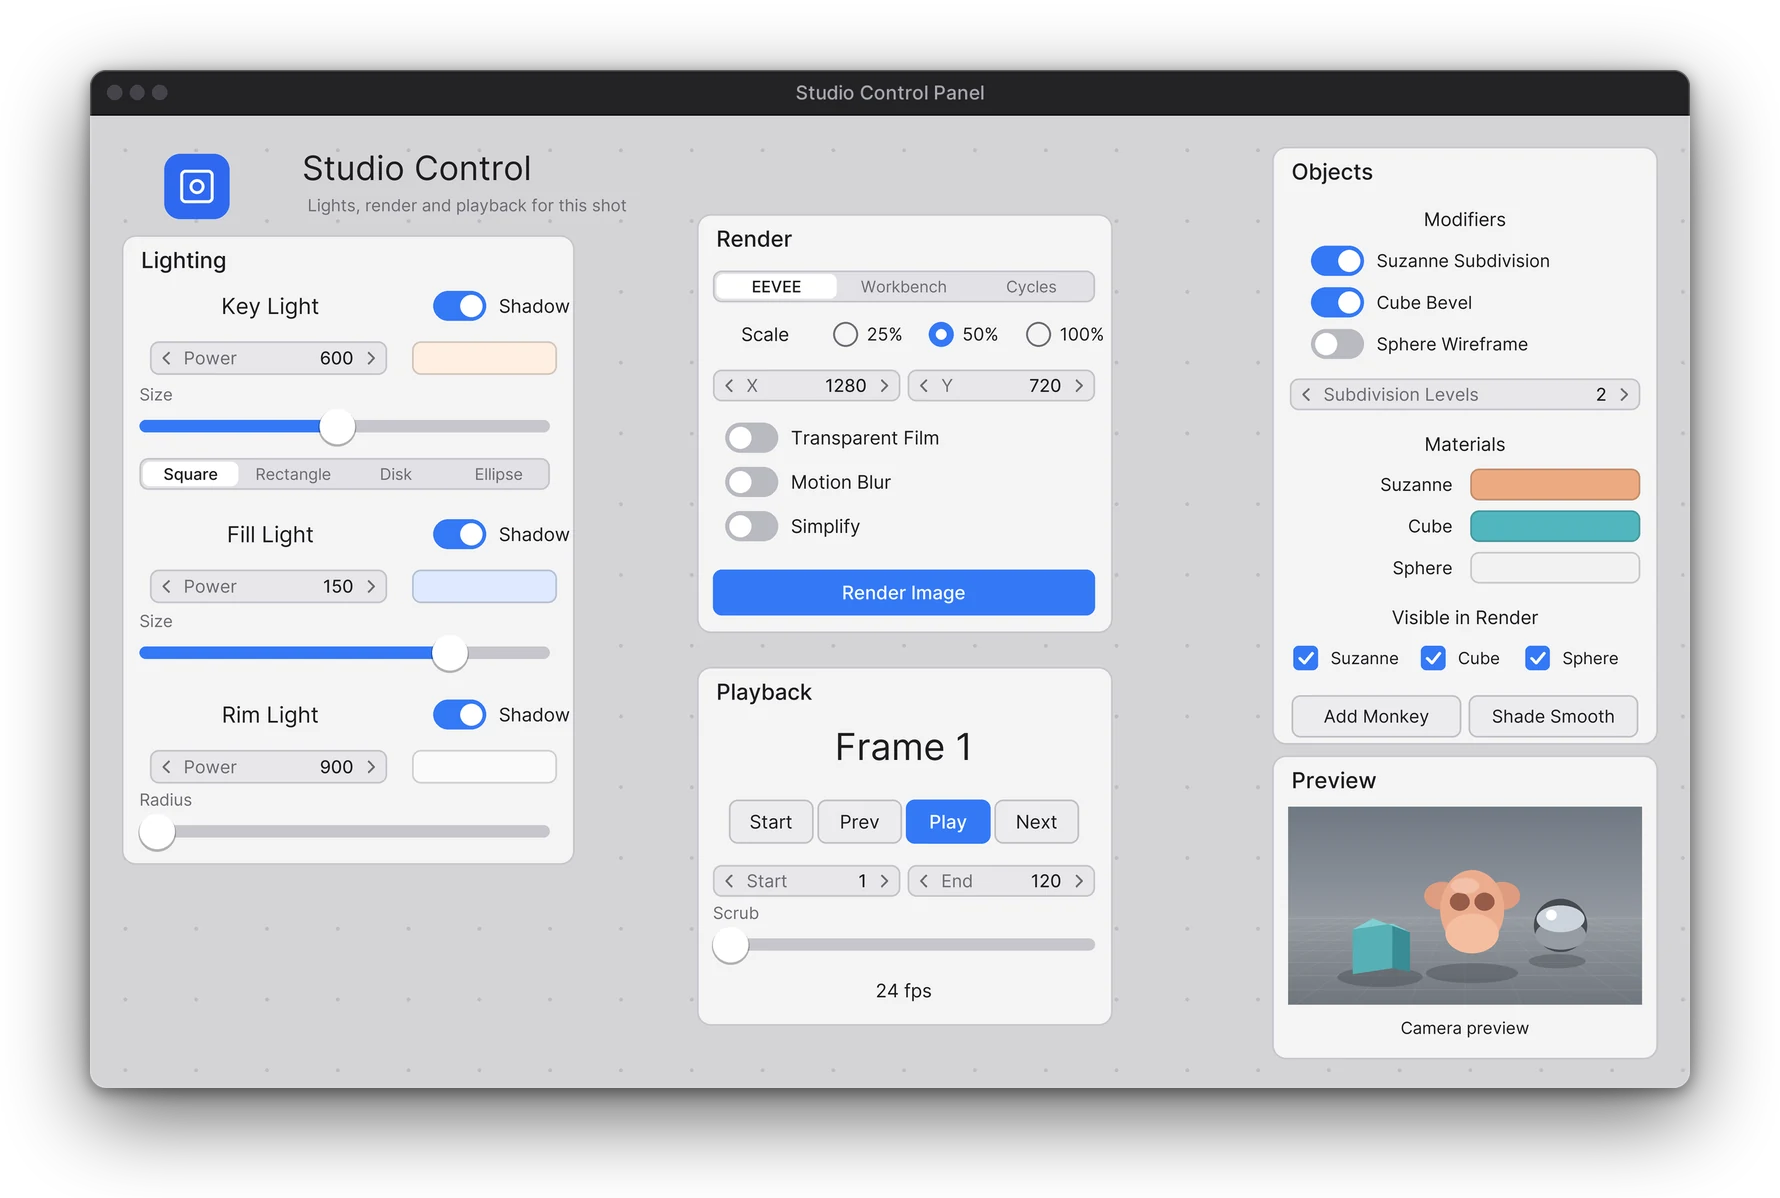
The Studio Control Panel in Live Mode: Lighting with Key, Fill and Rim lights, Render settings and Playback buttons, every widget bound to the scene.
A control panel canvas: lights, render settings, playback and objects, one click away.

In Blender

Recording
Your panel drives the scene. In Live Mode every toggle, field and slider changes the scene right away: modifiers, light shadows, light power and the current frame.
A control panel canvas next to the 3D Viewport: lights, render settings, playback and objects one click away.Screenshot
Studio control panel (Dark). A control panel canvas next to the 3D Viewport: lights, render settings, playback and objects one click away.
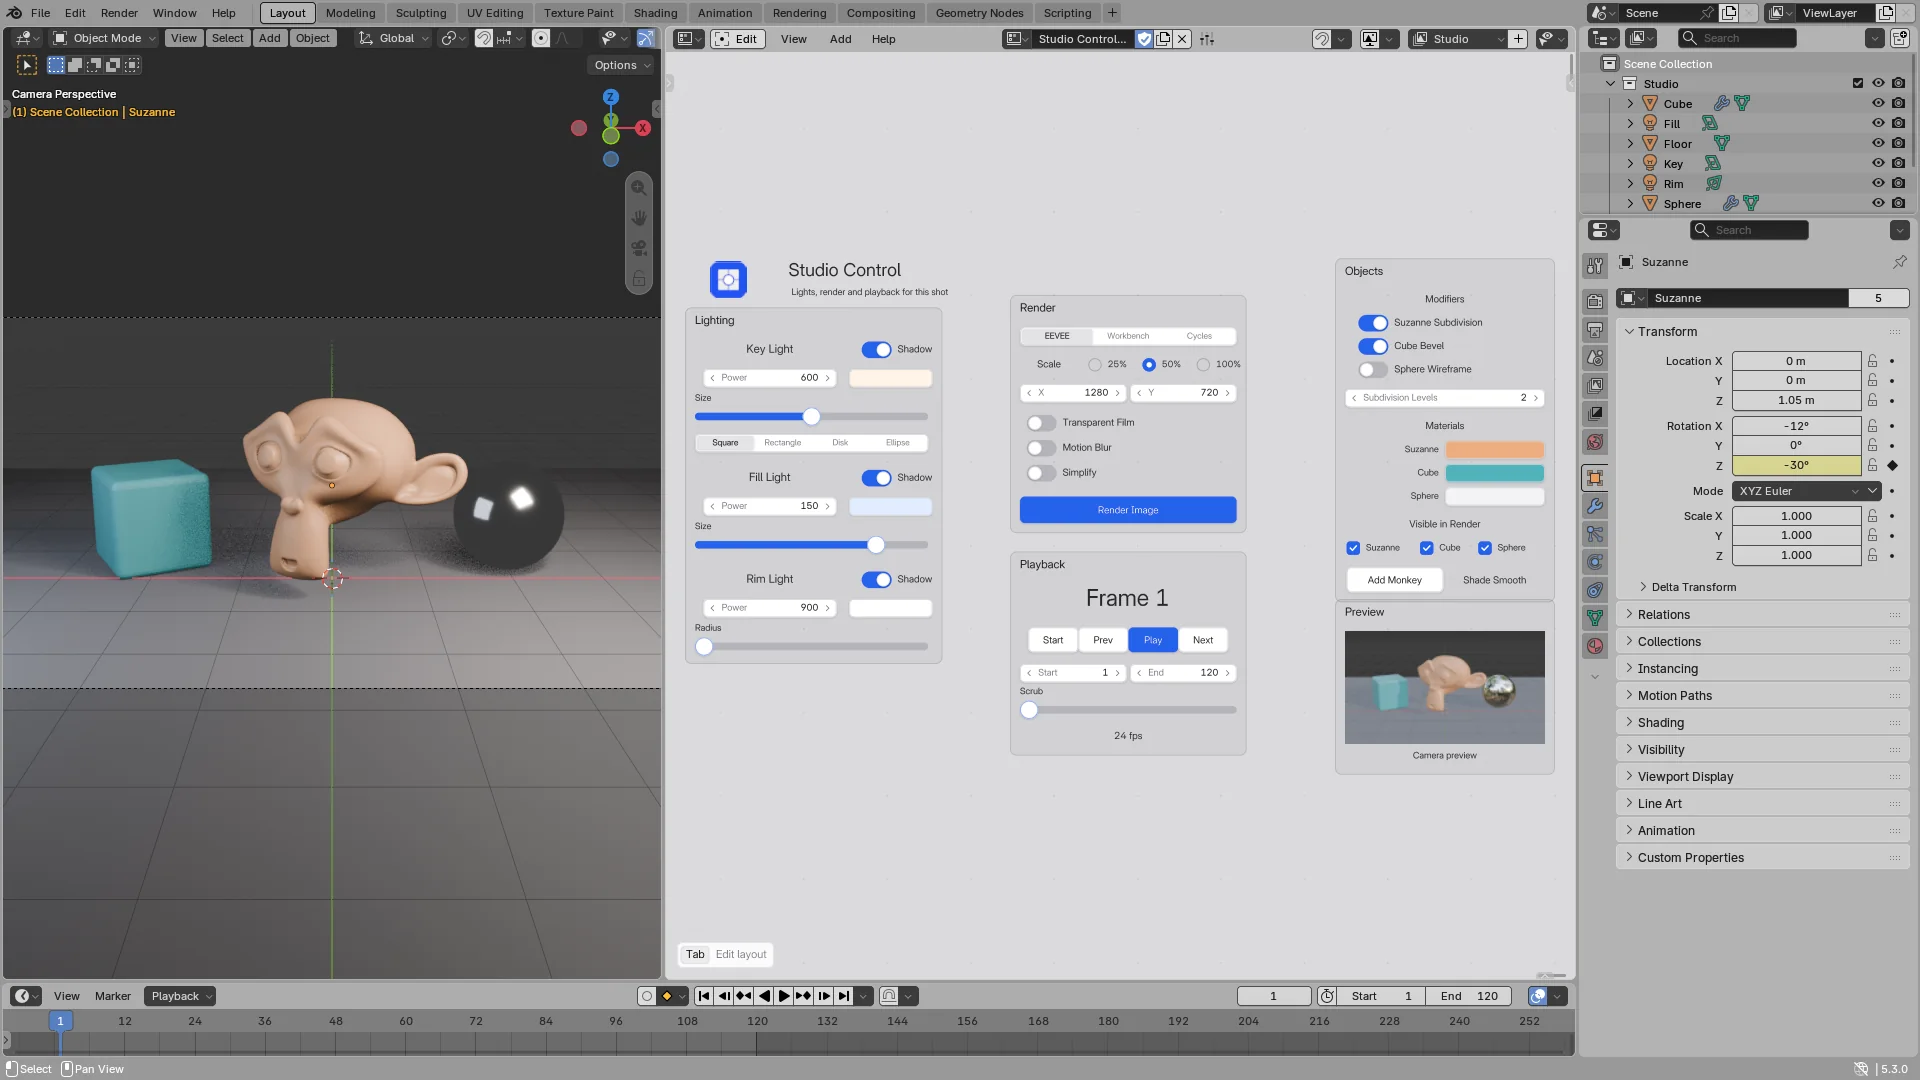
The same control panel in the Light appearance, next to a light Blender theme.Screenshot
Studio control panel (Light). The same control panel in the Light appearance, next to a light Blender theme.

Edit Mode and Live Mode

Tab switches. Edit Mode builds the layout; Live Mode uses it. On a picker, Live Mode is Blender's own Pose Mode.

Move around

Middle mouse pans, the Wheel zooms, Home frames every widget. The minimap shows the whole canvas: click to centre, drag to pan.

Keys you already know

Canvas keys come first. Any other key goes to Blender: Space plays, Ctrl S saves, Ctrl Z undoes. Industry Compatible and custom bindings work too.

One undo step each

Every edit and every use of a widget is one undo step. Undo never switches you out of Live Mode.

Copy a whole canvas

Make it single user, Duplicate it in the Outliner, or Append it from another file: pages, frames, groups and Flex Boxes come along.

Show or hide widget types

The last menu of the header hides or shows each widget type in this editor: hide the buttons to work on sliders.

02

Widgets

22 widgets

Buttons, data, tools, graphics and layout.

Operator and Custom Script buttons. Toggles, Enums, Lineal sliders, Number Fields, Labels and Lists for any property. Color Swatch, Color Picker, Color Palette, Brush Picker and Ring Menu. Images, live 3D views, Frames, Flex Boxes and Groups. The picker adds knobs, 2D pads, bone collection toggles and bone pickers.

  • A Label, a Style and Conditions on most widgets
  • Your own tooltip text on any widget
  • Themes set the look of all of them at once
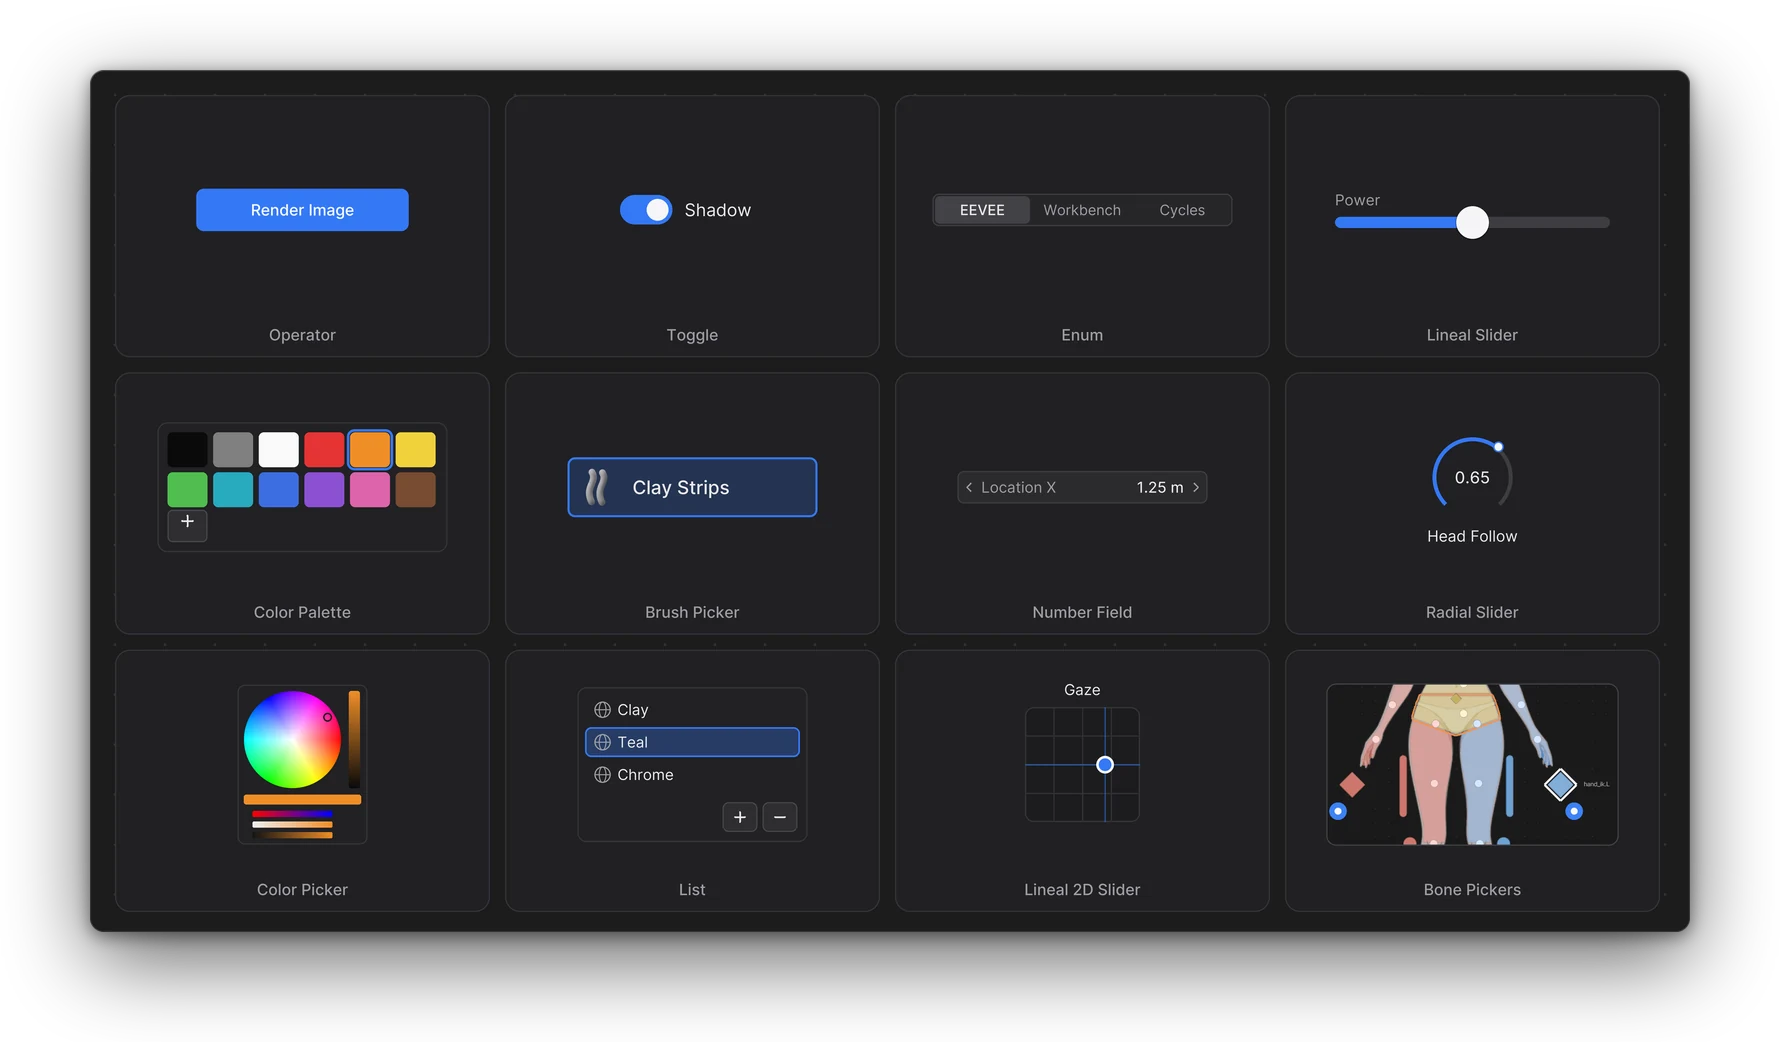
Twelve FlexSpace widgets on a board: buttons, toggles, enums, sliders, colours, brushes, lists, knobs, pads and bone pickers.

In Blender

Recording
Precise sliders. Drag a Lineal slider, hold Shift for ten times finer control, or double-click it and type an exact value.
Frames hold widgets and move them as one; Flex Boxes and Groups keep them in line.Screenshot
Frames, groups and flex boxes. Frames hold widgets and move them as one; Flex Boxes and Groups keep them in line.
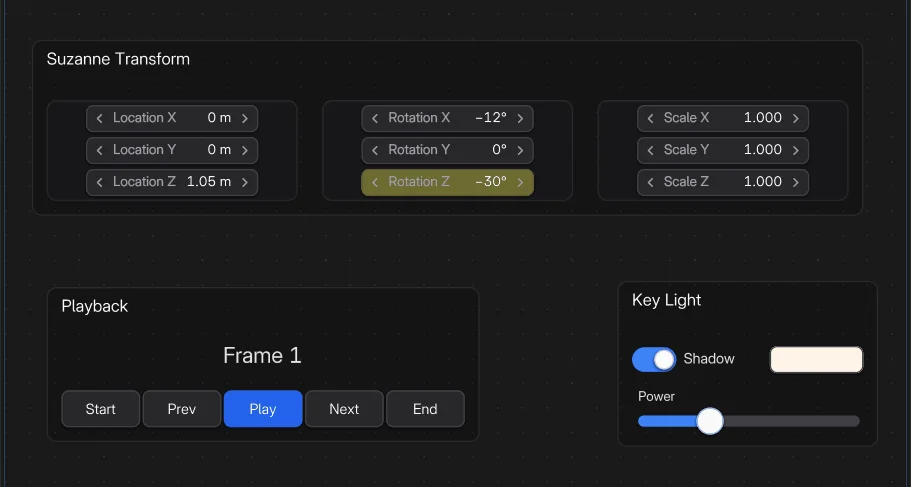
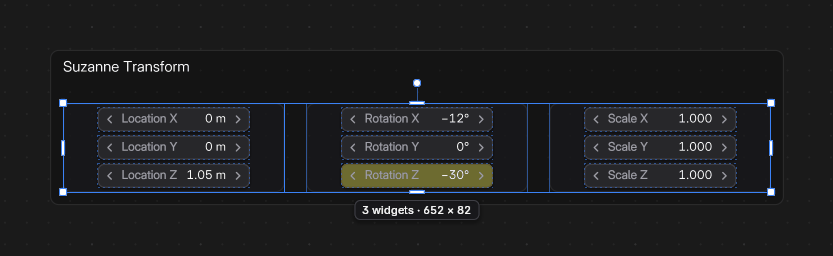
Flex Boxes line widgets up in a row or a column: here Suzanne's location, rotation and scale, each added in one pick with From Property.Screenshot
Flex Box. Flex Boxes line widgets up in a row or a column: here Suzanne's location, rotation and scale, each added in one pick with From Property.
The Add menu

Type, Enter, click to place.

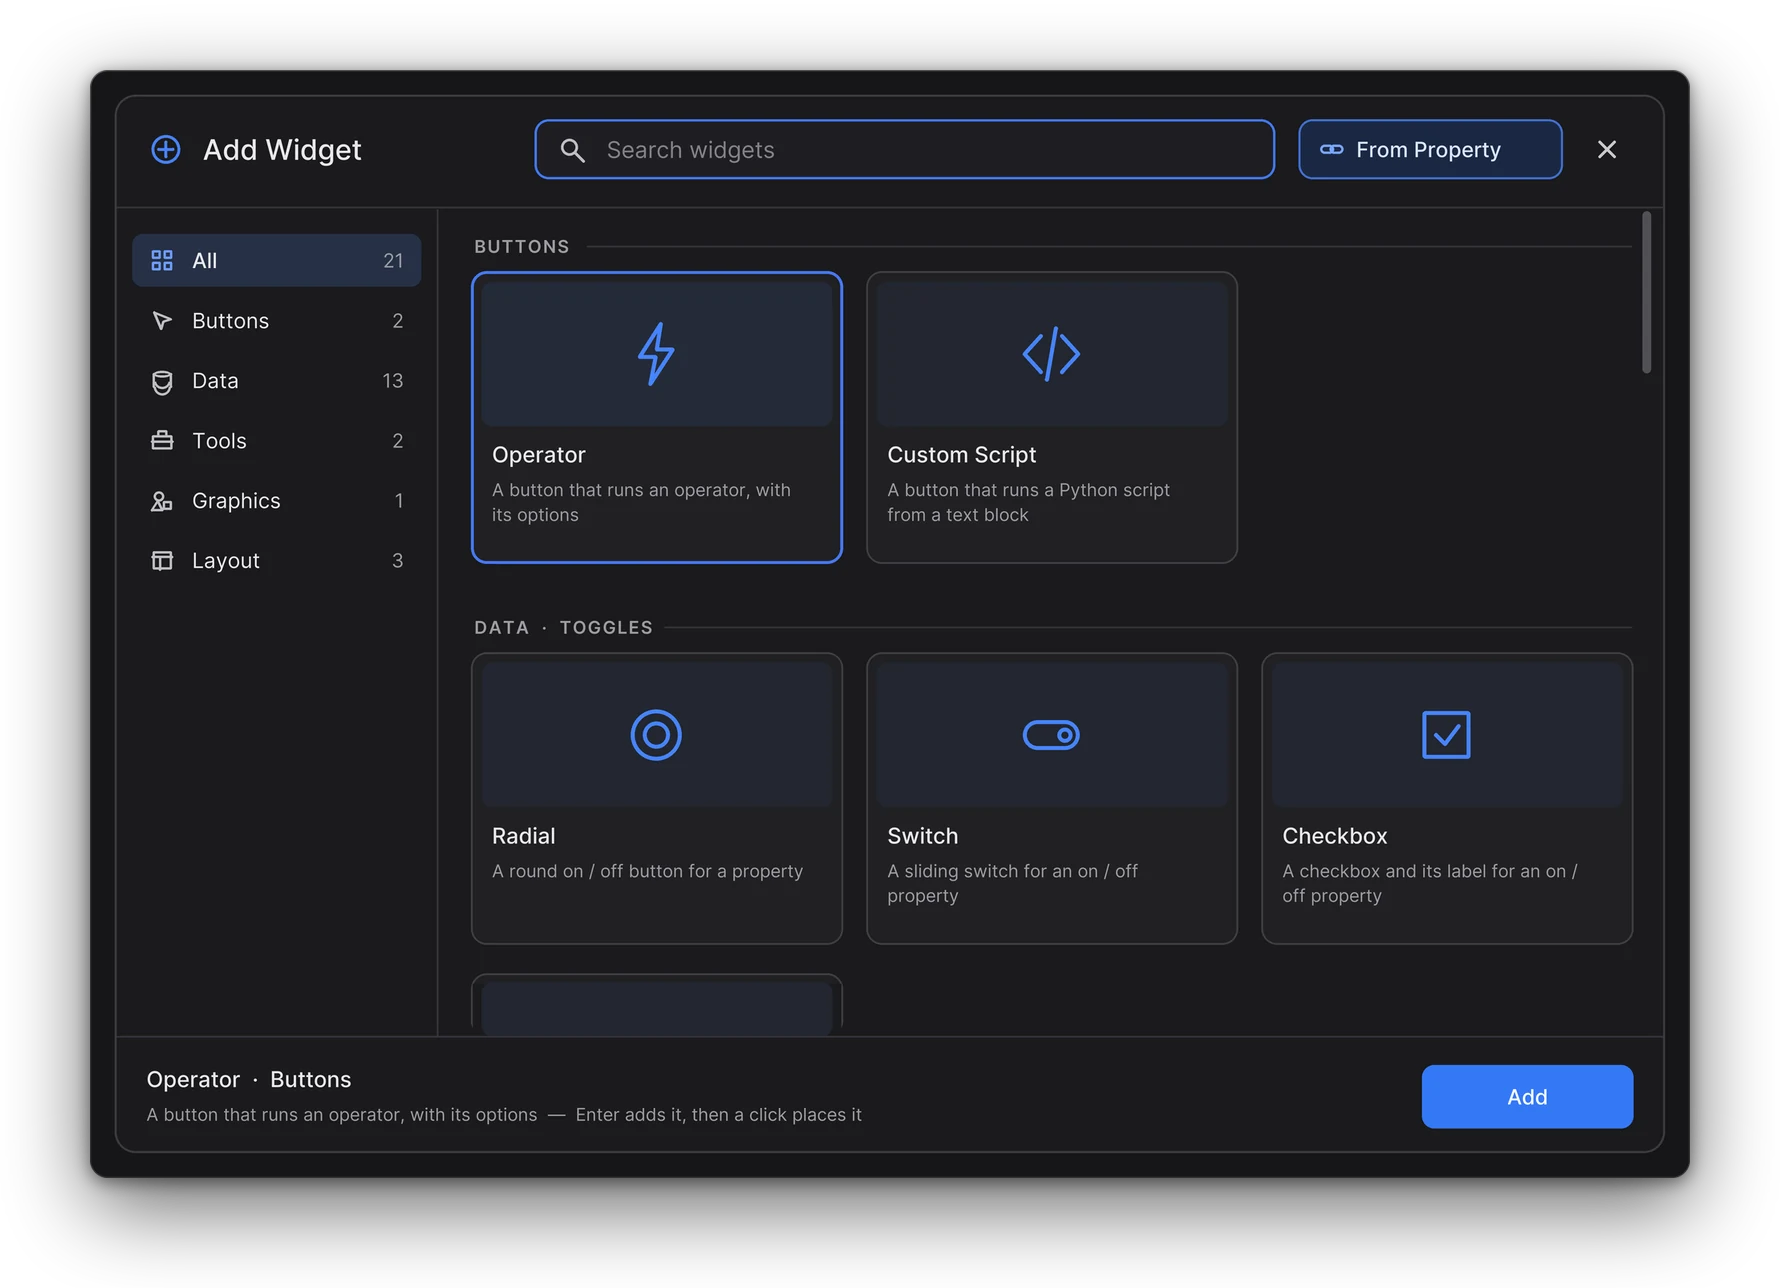
Shift A opens the Add Widget panel over the canvas. Start typing: the best match is selected. Tab goes to the next category; the arrow keys move the selection. Or use the header's Add menu, or set Add Menu to Pie.

  • From Property: right-click a property, get the right widget, bound and labelled
  • Widgets the page's mode can't take are dimmed, with the reason
  • Undo removes a whole addition in one step
The Add Widget browser: search, categories, widget cards and From Property.

In Blender

Recording
Add any widget in seconds. Press Shift A, type a few letters, pick the card and click to place the new widget on your canvas.
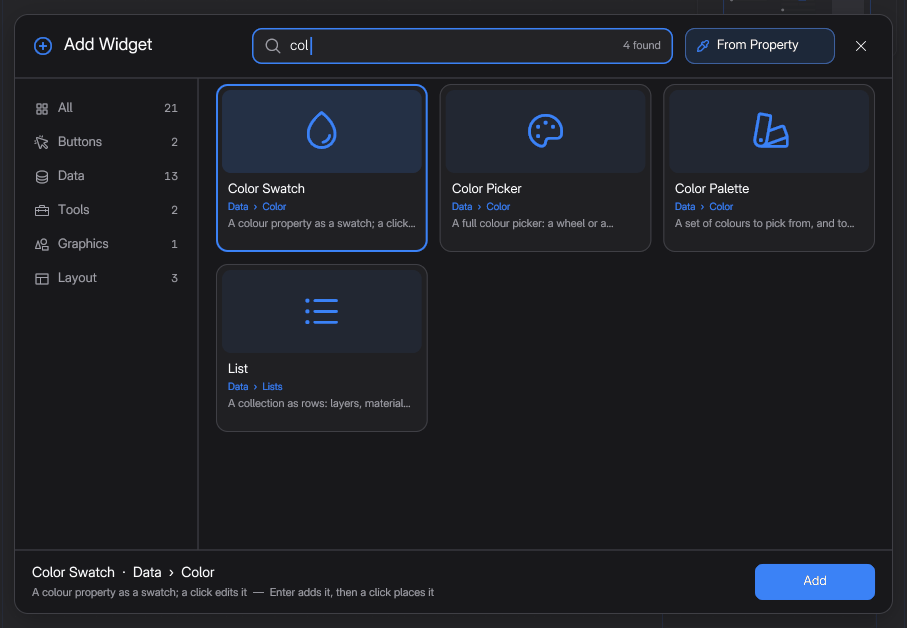
Type a few letters and the best matches show across every category; Enter adds the selected one.Screenshot
Search as you type. Type a few letters and the best matches show across every category; Enter adds the selected one.
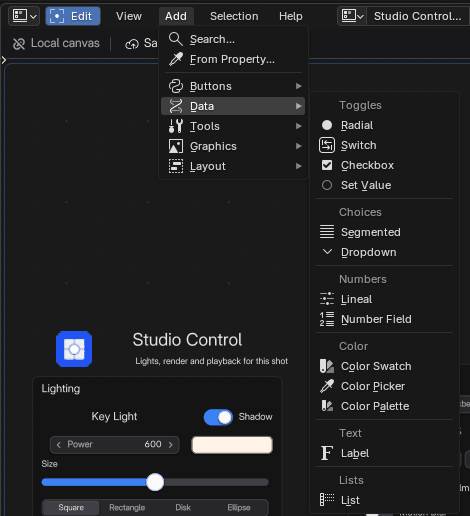
The header's Add menu: Search, From Property and every category, its subcategories under headings.Screenshot
Header Add menu. The header's Add menu: Search, From Property and every category, its subcategories under headings.
03

Binding

Data paths and the eyedropper

Point at a property. Done.

A data path starts from the current context, the way Python reaches it through bpy.context: scene.frame_current, active_object.location[0]. Click the eyedropper next to the field and right-click the property in any editor: the path is filled in, and a slider gets its Min and Max too.

  • Follow the active object, or pin one: renaming it keeps the binding
  • Copy Full Data Path pastes straight in
  • Pick Operator from UI copies a button's operator and settings
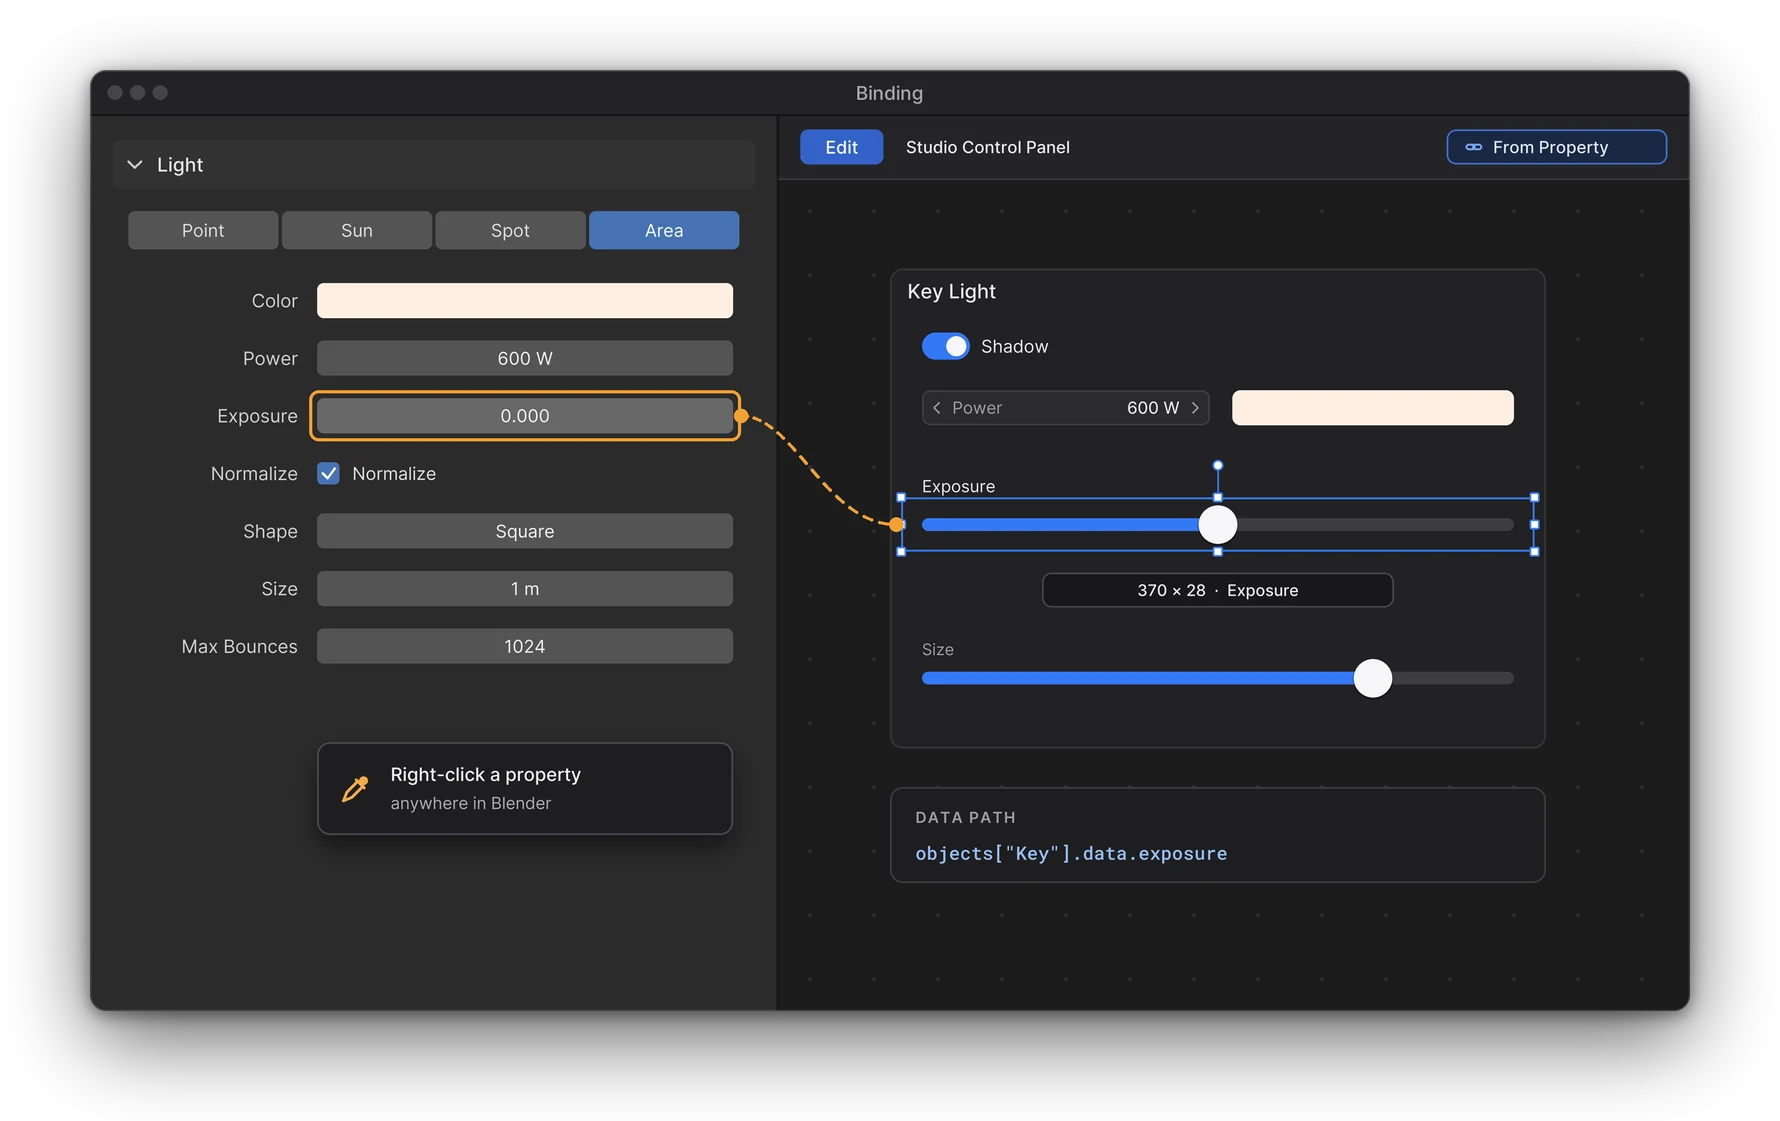
Binding with the eyedropper: right-click Exposure in Blender's Light properties and the canvas slider is bound to it; its data path shows below.
The eyedropper is on: right-click the light's Exposure and the selected slider is bound to it.

In Blender

Recording
Bind any property with a right-click. Choose From Property, right-click a property in Blender and get a widget already bound to it, ready to drive the scene.
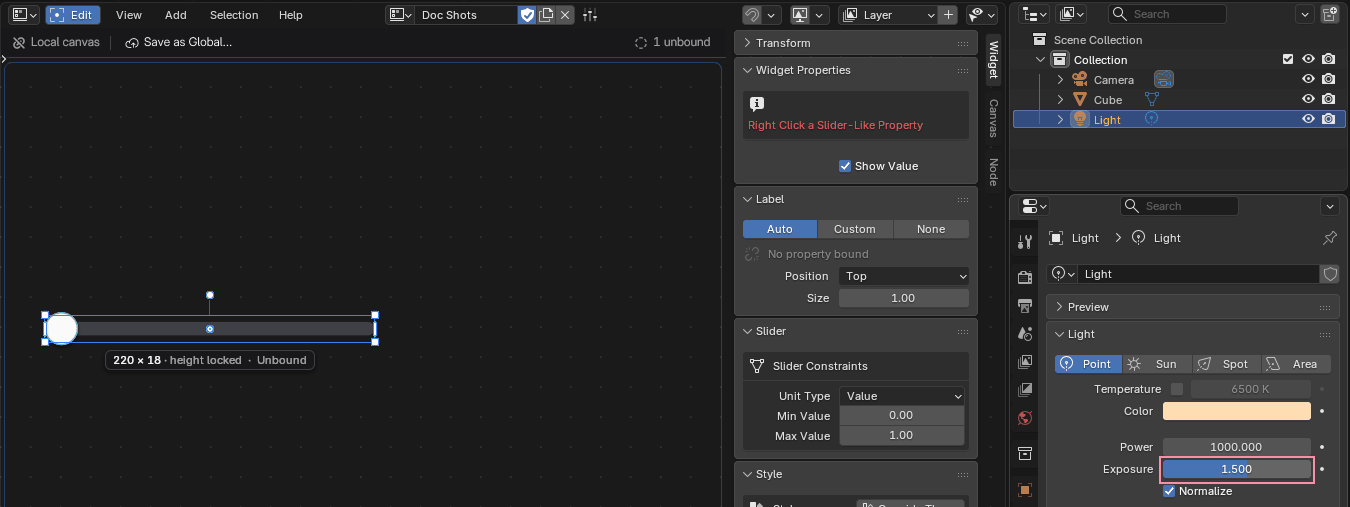
Bind a slider with the eyedropper: right-click any slider-like property, here the light's Exposure.Screenshot
Binding eyedropper. Bind a slider with the eyedropper: right-click any slider-like property, here the light's Exposure.
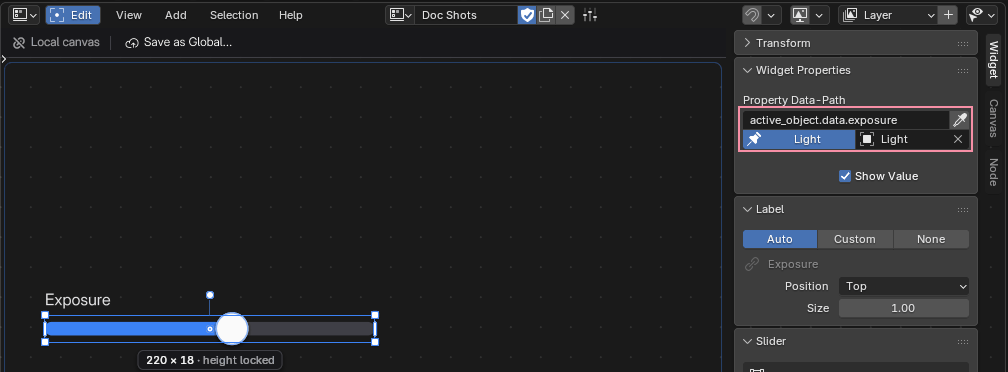
After the pick the slider is bound to the light's exposure, pinned to that light, and labelled for you.Screenshot
Bound data path. After the pick the slider is bound to the light's exposure, pinned to that light, and labelled for you.
Add to FlexSpace Canvas

Right-click anything. Put it on a canvas.

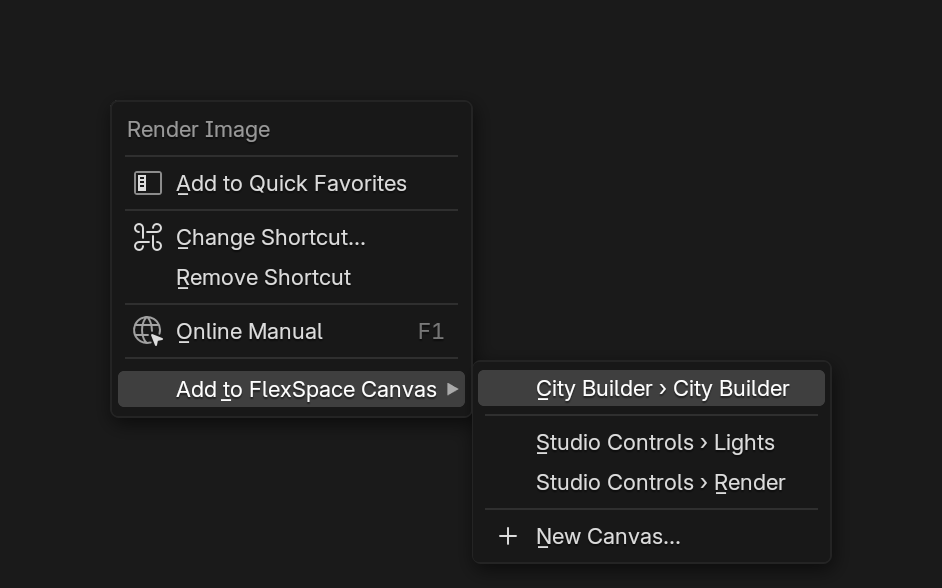
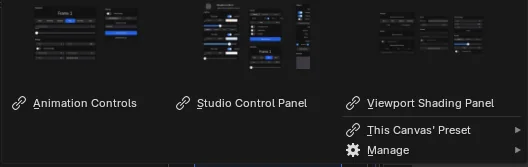
Right-click any property or button in Blender (the Properties editor, a sidebar, a menu item, a node) and choose Add to FlexSpace Canvas, then a canvas and page. The canvas you used last comes first, with its current page; New Canvas... makes one. You get the same widget as From Property, or an Operator button that runs the button's operator with the same settings.

  • It lands on a free spot in the part of the page you can see, and flashes once
  • On one item of a vector: Add All or Add Single
  • One Ctrl Z removes it
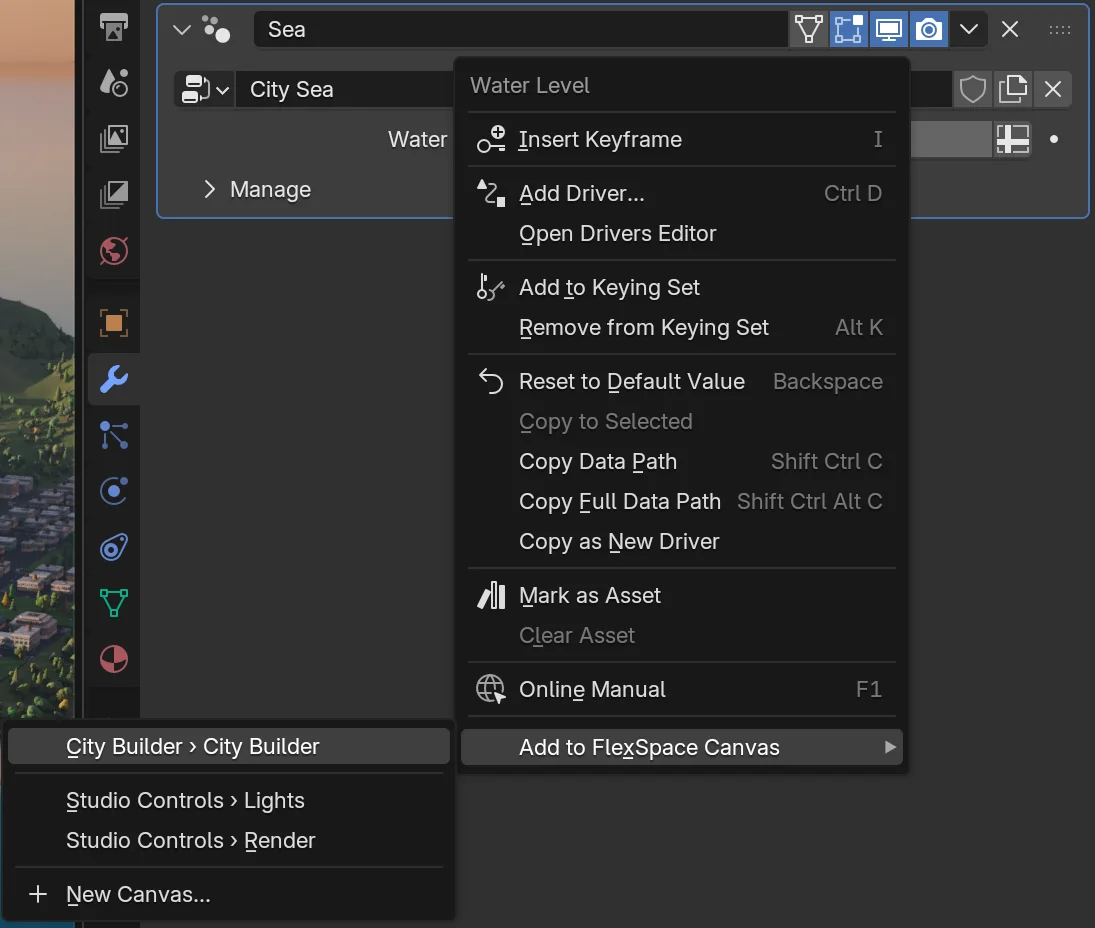
Right-click the Sea modifier's Water Level, Add to FlexSpace Canvas: the submenu lists City Builder, the canvas used last, then the pages of Studio Controls and New Canvas...
Right-click a property, here a Geometry Nodes input of the City Builder demo, and pick the page.

In Blender

Right-click Render Image in the Render menu: the same entry adds an Operator button that runs it with the same settings.Screenshot
On a button too. Right-click Render Image in the Render menu: the same entry adds an Operator button that runs it with the same settings.
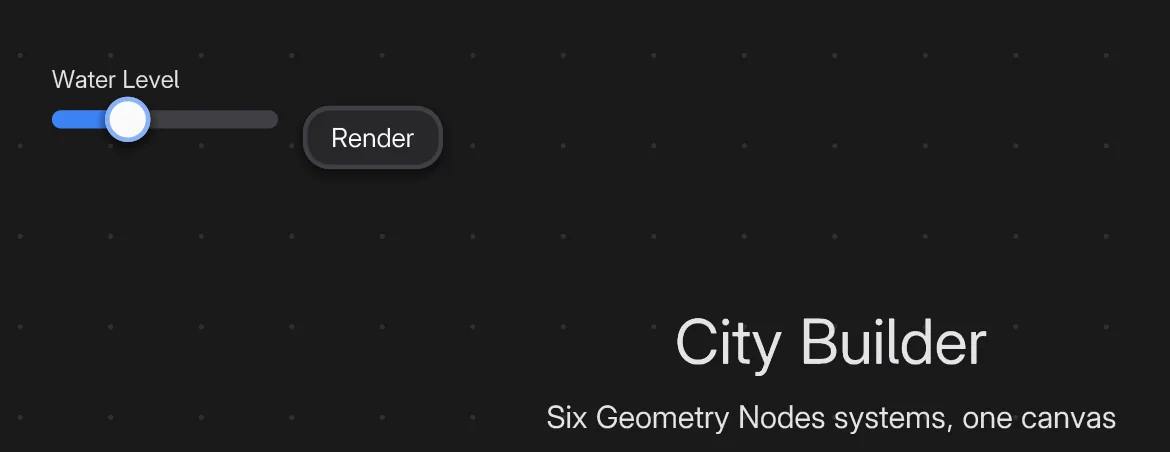
Both widgets went to a free spot in the part of the page in view: a Water Level slider bound to the Sea modifier and a Render button.Screenshot
On the page, bound. Both widgets went to a free spot in the part of the page in view: a Water Level slider bound to the Sea modifier and a Render button.
Conditions, tooltips, broken bindings

Panels that explain and adapt.

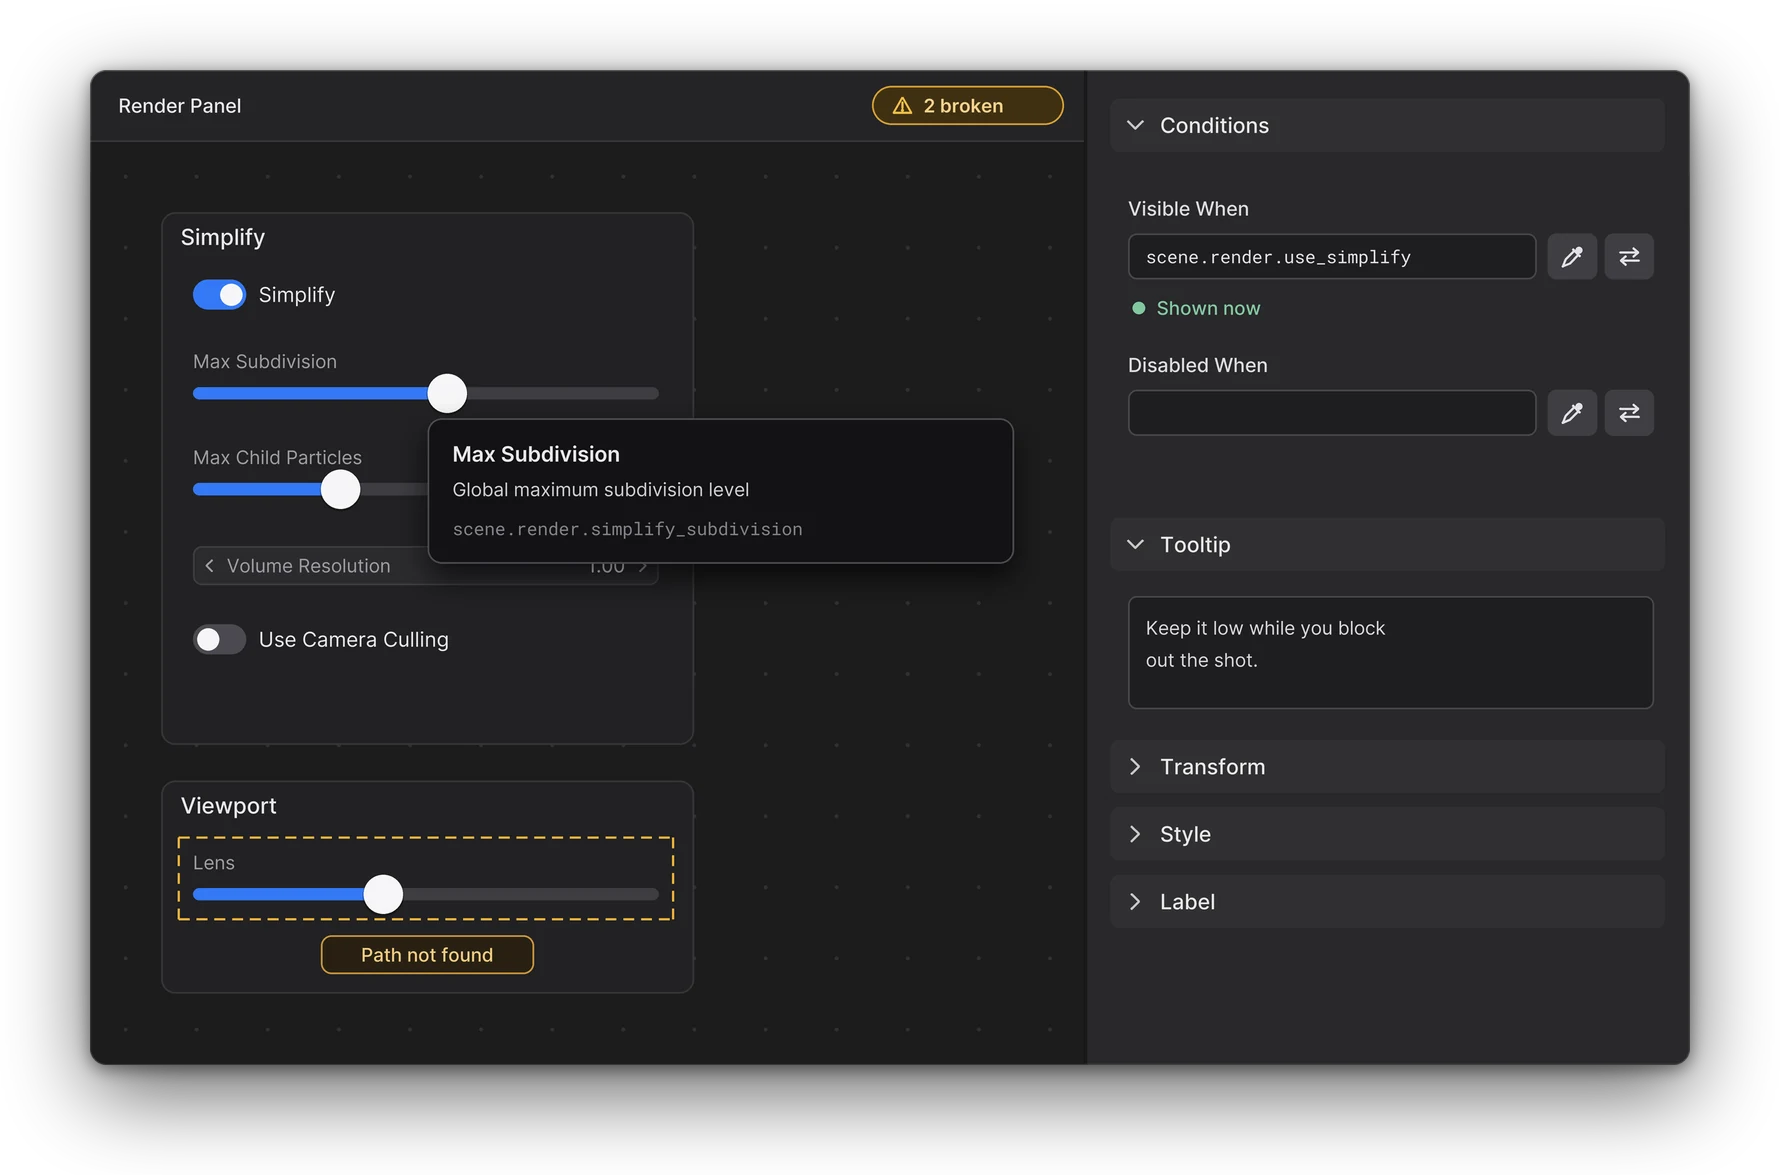
Visible When shows a widget only while a property is on; Disabled When greys it out. Put a condition on a Frame, a Flex Box or a group and everything inside follows. In Edit Mode, a widget whose path doesn't work gets a dashed outline, and the top bar counts them: ⚠ 2 broken.

  • The panel says what the condition does now: Shown, Hidden, Disabled, Usable
  • Click the count to frame the next broken widget
  • Tooltips show the property, its data path and any problem
A tooltip with the property's name, description and data path over a Simplify slider; the top bar counts 2 broken bindings and a widget whose path is gone is flagged Path not found.

In Blender

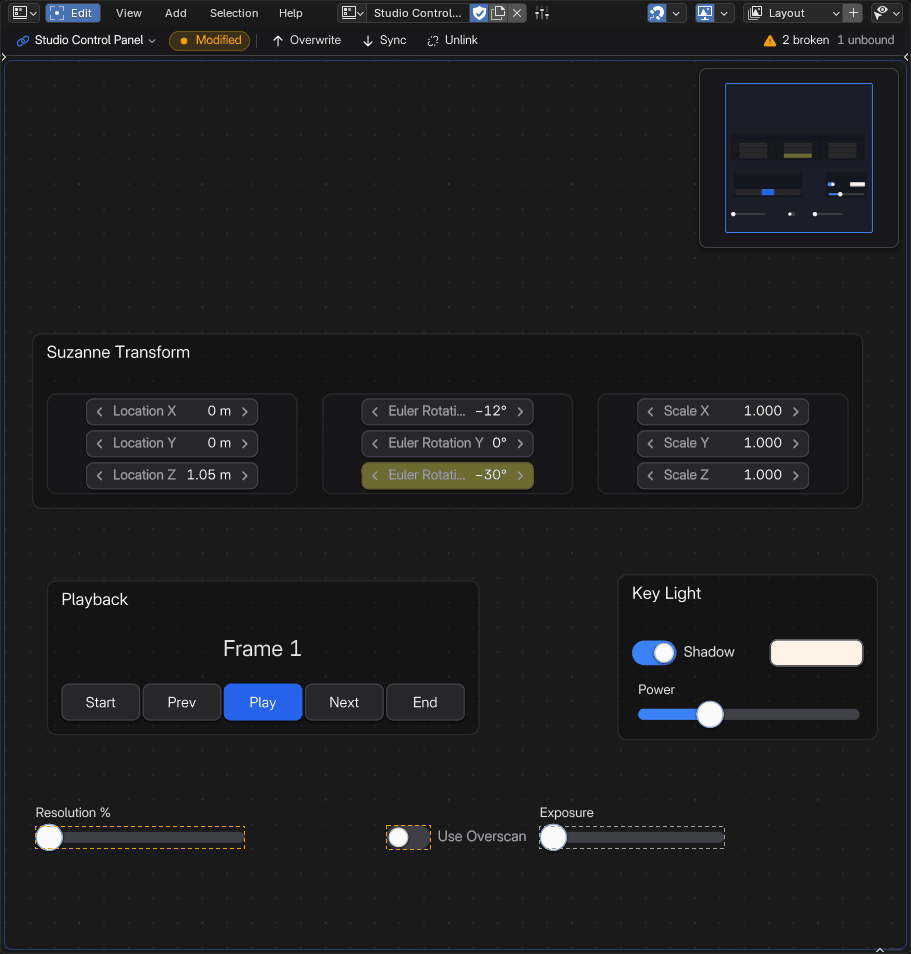
A mistyped path or the wrong kind of property gets a dashed outline, and the top bar counts them.Screenshot
Broken bindings. A mistyped path or the wrong kind of property gets a dashed outline, and the top bar counts them.
The top bar in Edit Mode: the preset and its state (Modified, Overwrite, Sync, Unlink), and the bindings that need you.Screenshot
Canvas top bar. The top bar in Edit Mode: the preset and its state (Modified, Overwrite, Sync, Unlink), and the bindings that need you.

Animation state

A bound widget shows its property's state in Blender's own colours: green animated, yellow keyframe, purple driver, orange changed.

Key it from the canvas

Over a widget in Live Mode: I inserts a keyframe, Alt I deletes it, Backspace resets it to its default.

Auto Keying

With Auto Keying on, the end of a drag keys the properties it drives, in the same undo step. Your Auto Keying options are followed.

04

Pages and modes

Show When

The right page for what you're doing.

A canvas can hold a sculpting page full of brushes, a weight paint page, the controls of one object and an everyday page. Each page shows Always, in one Mode, for one Object, or for one Object in Mode. Switch Pages Automatically shows the one that fits best.

  • A thin border in the mode's colour shows the page's mode
  • A notice says which mode it needs; Enter switches to it
  • A page for another object offers Select

M moves widgets to another page

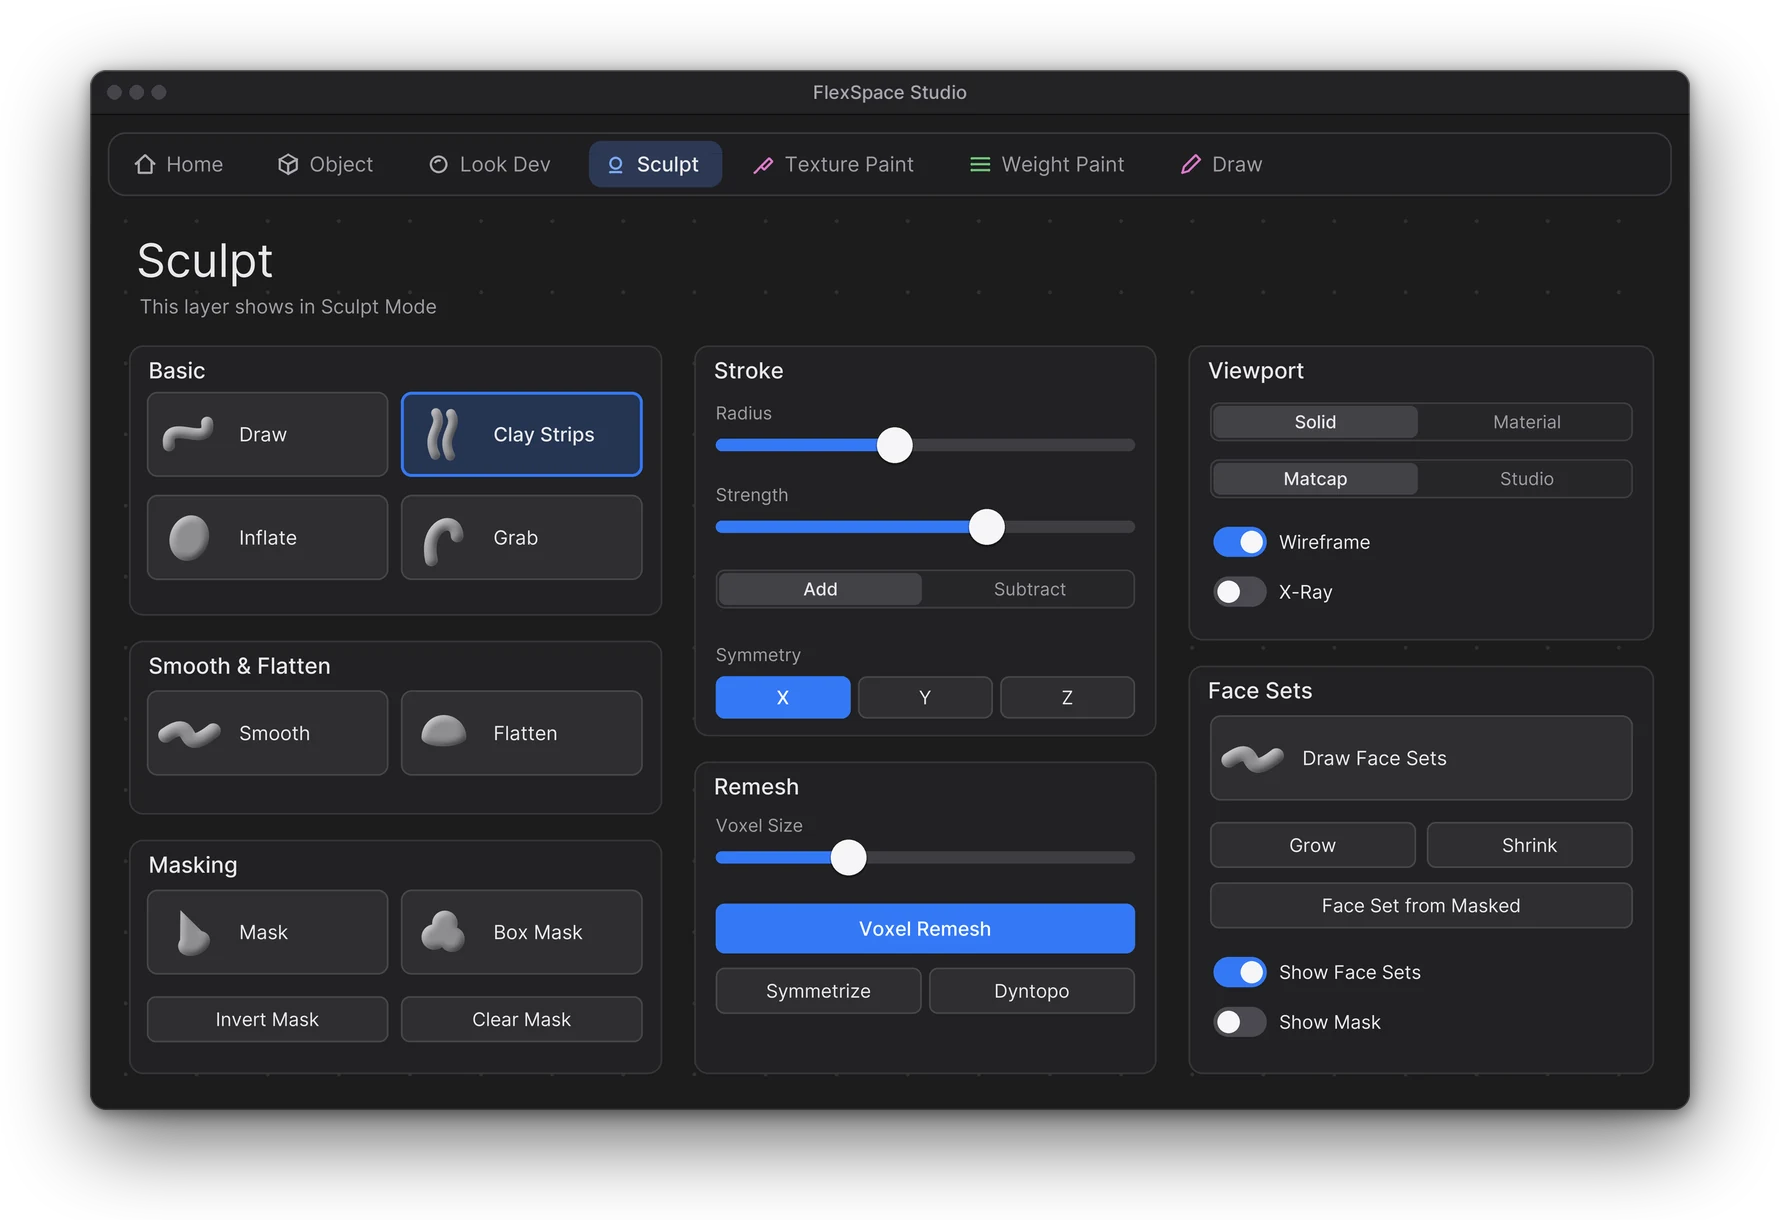
A canvas with a page per mode: the page tabs, Sculpt active, and the Sculpt page's brushes and stroke settings.
The Sculpt page of a canvas that has a page for each mode.

In Blender

Recording
One canvas, a page per mode. Switch to Sculpt, Texture Paint, Weight Paint or Draw and the canvas shows the controls made for that mode.
One canvas, a page per mode: the tabs show each page's mode, the active one is outlined.Screenshot
Pages and modes. One canvas, a page per mode: the tabs show each page's mode, the active one is outlined.
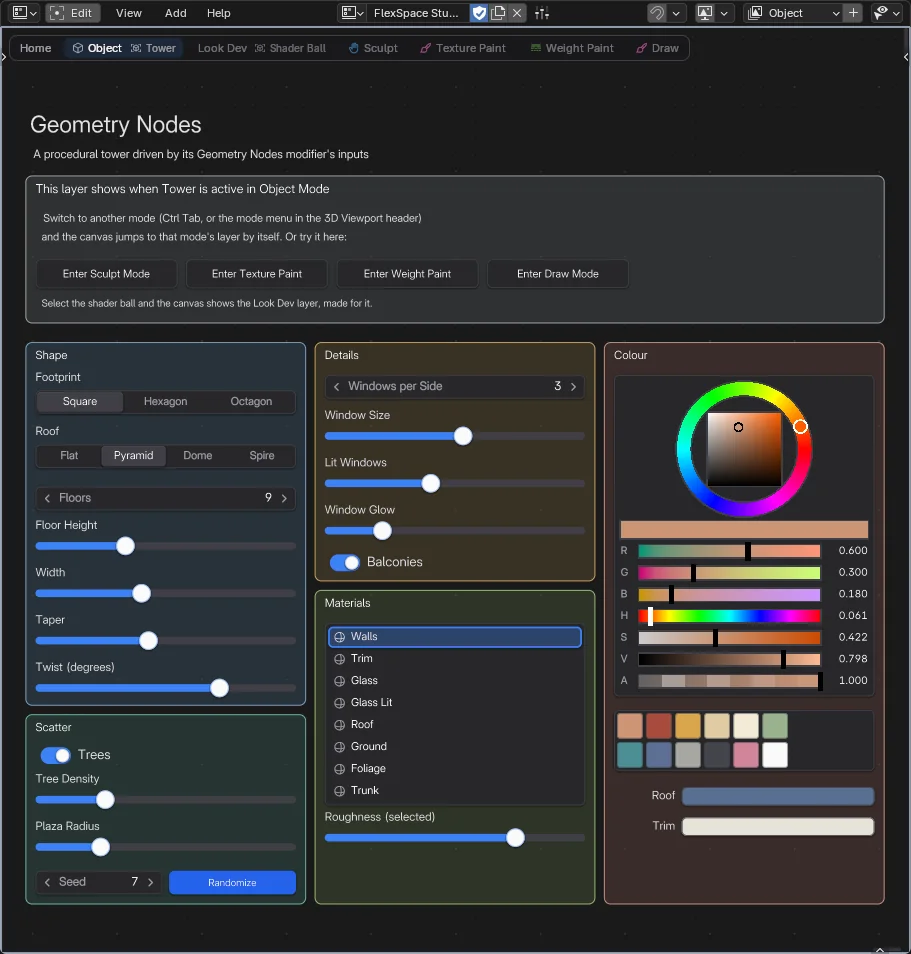
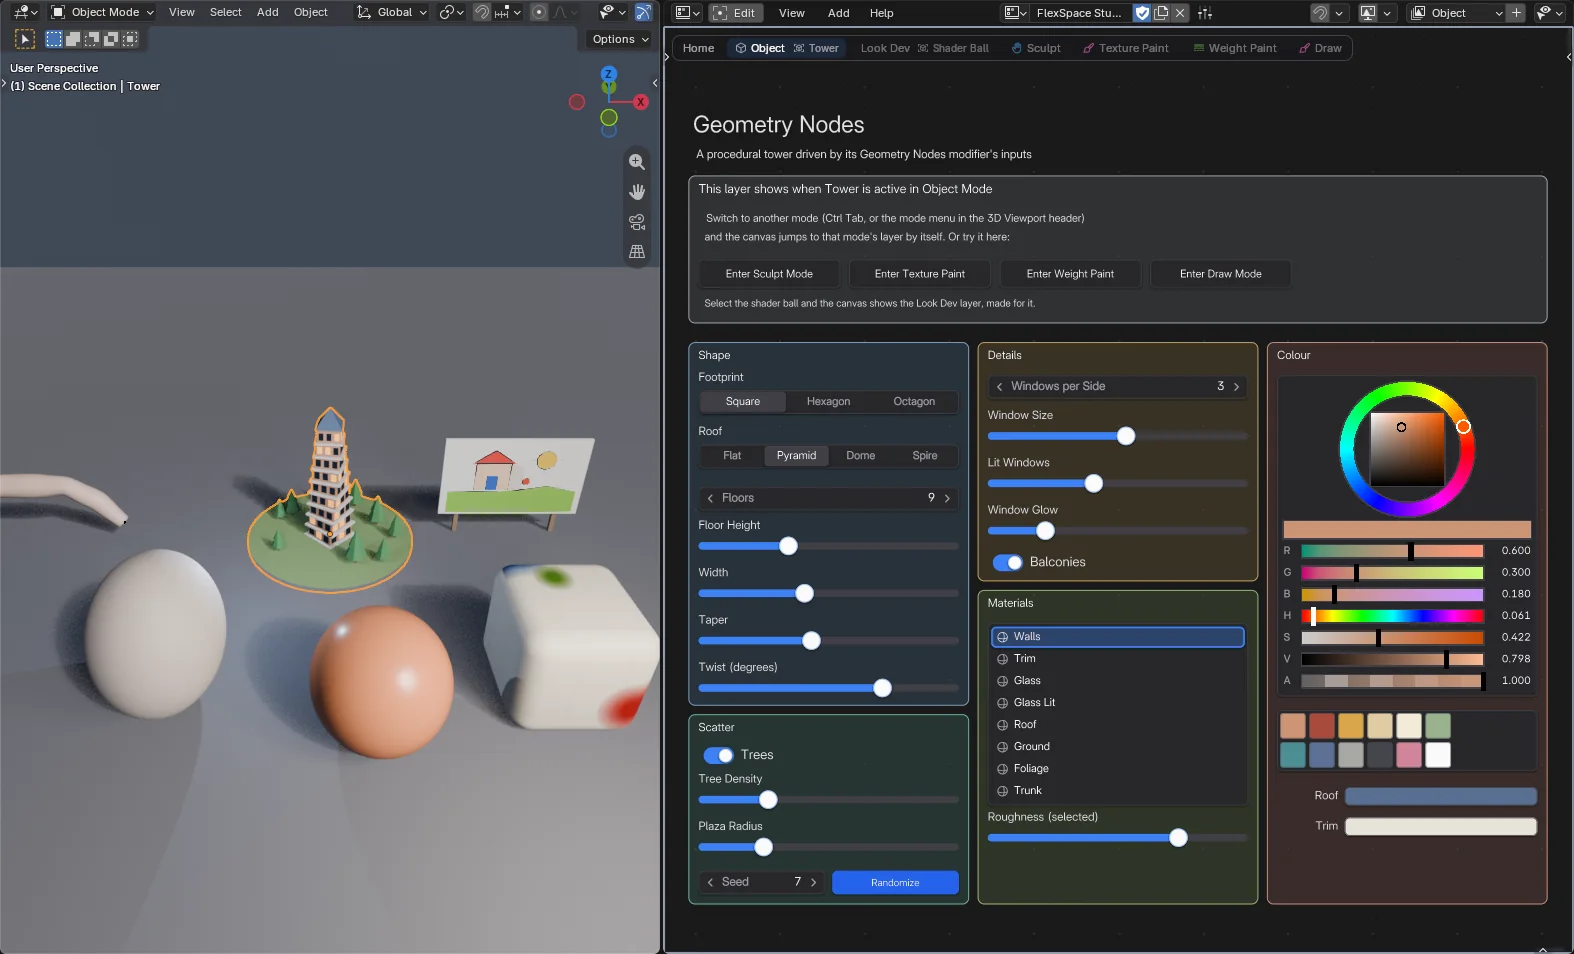
Select the Geometry Nodes tower and the canvas shows its page: shape, details, materials and colour controls.Screenshot
FlexSpace Studio: Object page. Select the Geometry Nodes tower and the canvas shows its page: shape, details, materials and colour controls.

Buttons that change the mode

An Operator button that runs Enter Mode makes an object active and selected, frames it if you like, and enters a mode with it. The FlexSpace Studio demo has one for each mode.

Nothing is ever lost

Changing a page's mode never deletes widgets: a warning tells you how many don't fit. Edit Mode still works in any Blender mode, so you can build a page's layout first.

05

Editing tools

Smart snapping

Lay out like a design tool.

Drag a widget, or use G R S; the handles resize it and the round knob rotates it. Snapping lines it up with edges, centres, equal gaps and the grid, and guides show what it snapped to. Hold Ctrl to do the opposite.

  • Type a number for an exact value; X / Y lock an axis
  • Arrow keys nudge by 10 units, Shift by 1
  • Exact numbers in the sidebar's Transform panel
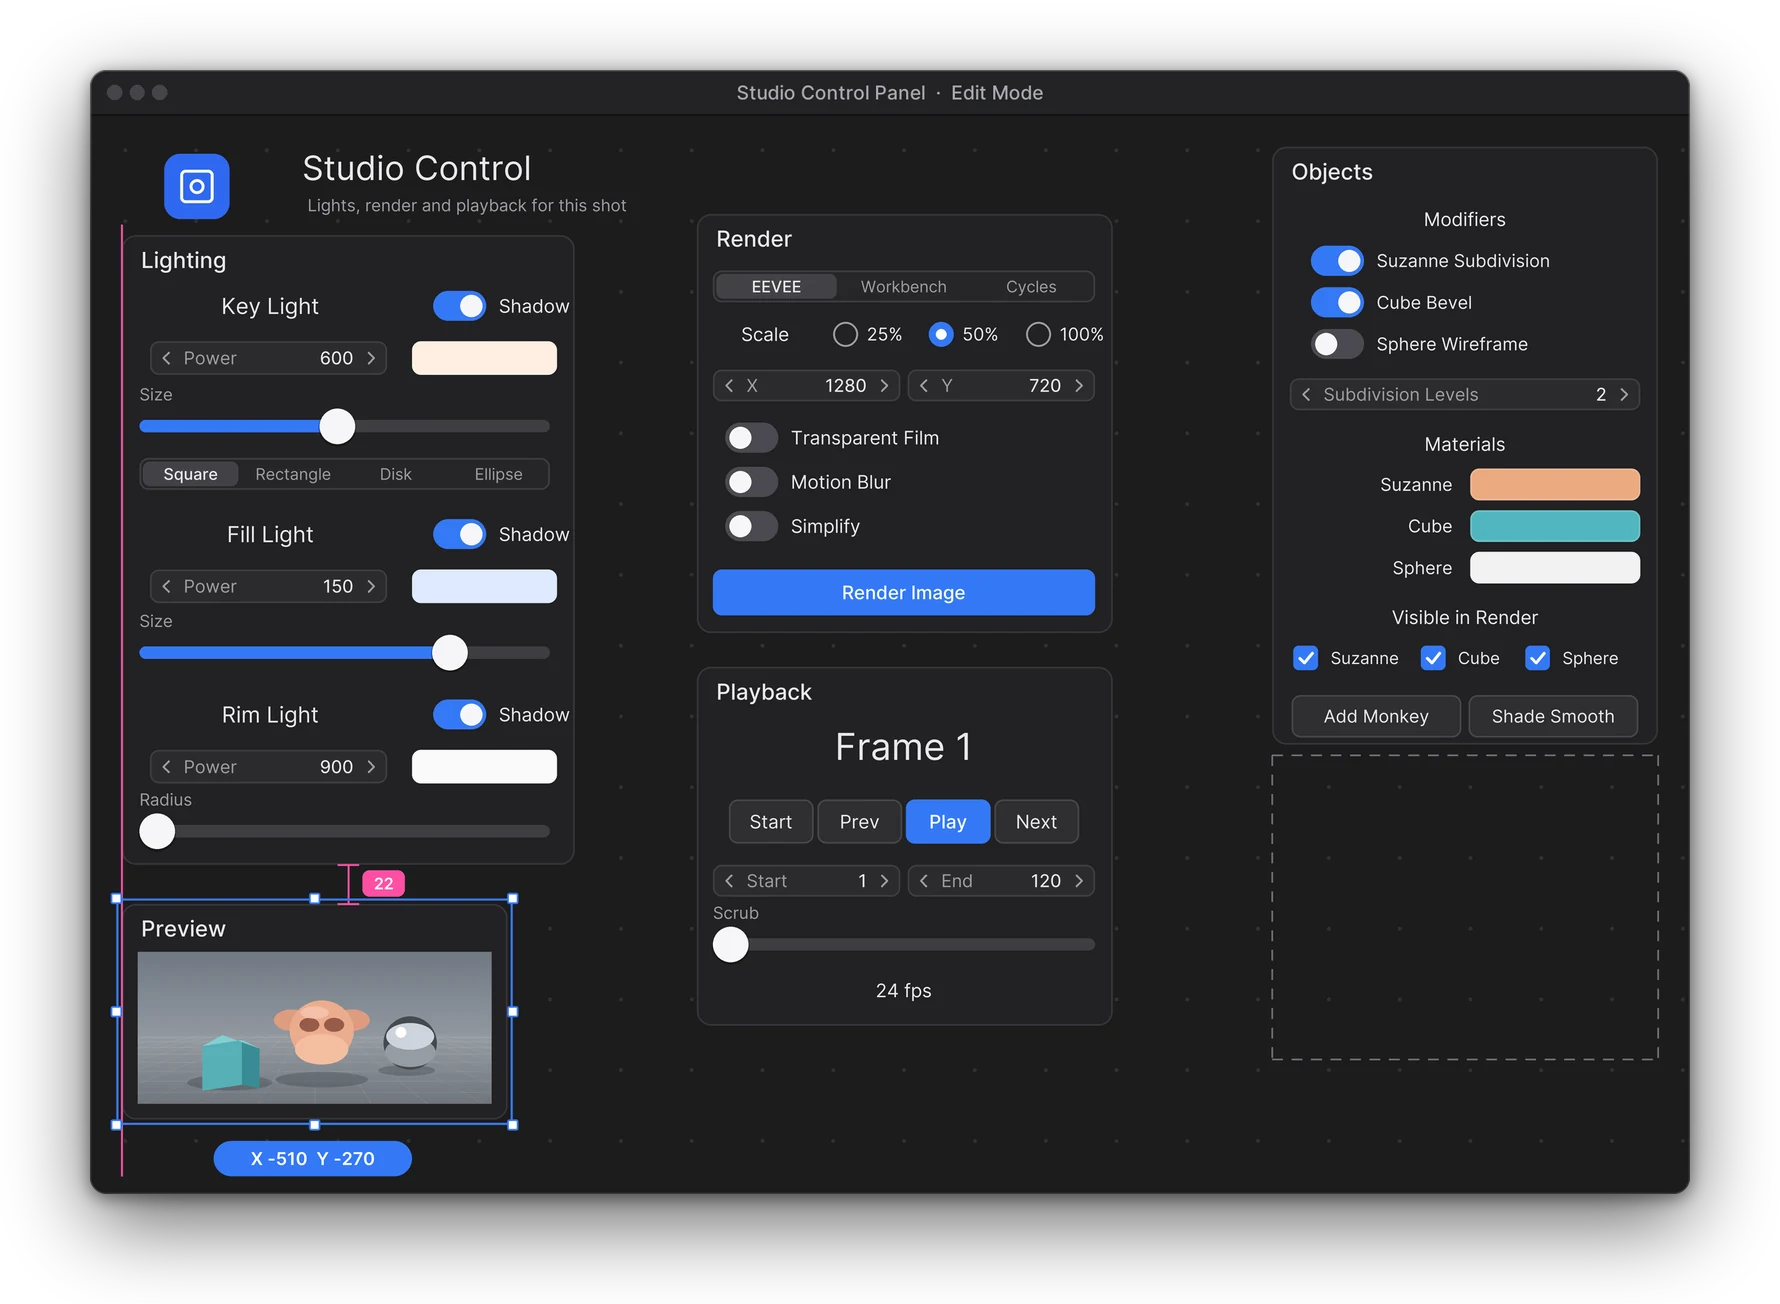
Edit Mode: the Preview frame dragged under Lighting snaps to its left edge; a magenta guide and the 22 px gap show what it lined up with.
A frame dragged under Lighting snaps to its left edge.

In Blender

Recording
Lay out with snapping and the Selection Bar. Drag widgets with smart snapping guides, align and distribute them from the Selection Bar, then group them and move them as one.
Drag a frame and it snaps to the edges, centres and equal gaps of its neighbours, with guides that show why.Screenshot
Smart snapping. Drag a frame and it snaps to the edges, centres and equal gaps of its neighbours, with guides that show why.
With several widgets selected, the Selection Bar aligns, distributes and matches their sizes.Screenshot
Selection Bar. With several widgets selected, the Selection Bar aligns, distributes and matches their sizes.
Handles resize the selection, the round knob rotates it and the chip shows its size.Screenshot
Selection handles. Handles resize the selection, the round knob rotates it and the chip shows its size.
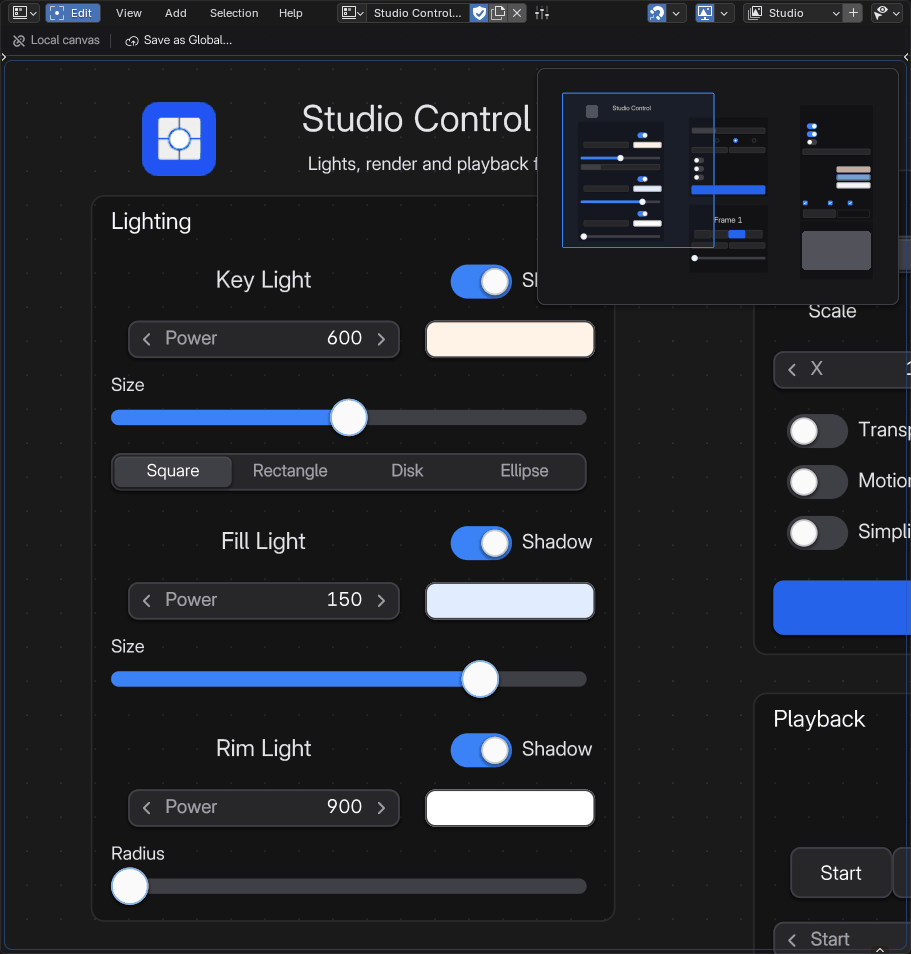
The minimap shows the whole canvas while you work zoomed in: click to jump, drag to pan.Screenshot
Minimap. The minimap shows the whole canvas while you work zoomed in: click to jump, drag to pan.
A Group moves, rotates and resizes several widgets as one; double-click to go inside.Screenshot
Group. A Group moves, rotates and resizes several widgets as one; double-click to go inside.

Selection Bar

With two or more widgets selected, a bar appears at the bottom of the canvas: Align, Distribute, match or normalize Size, Group and Ungroup.

Groups, Frames, Flex Boxes

Ctrl G groups, Ctrl J frames. A Flex Box lines up its children in a row or a column, like a web page.

Copy and paste

Ctrl C and Ctrl V work across canvases of the same kind. A Script button is pasted with its script, in a new text of its own.
Minimap

A small map of the whole canvas, in the corner you choose. Click to centre, drag to pan, double-click to frame everything.

06

Color & Brush

Ring Menu

A sculpt wheel that stays on the canvas.

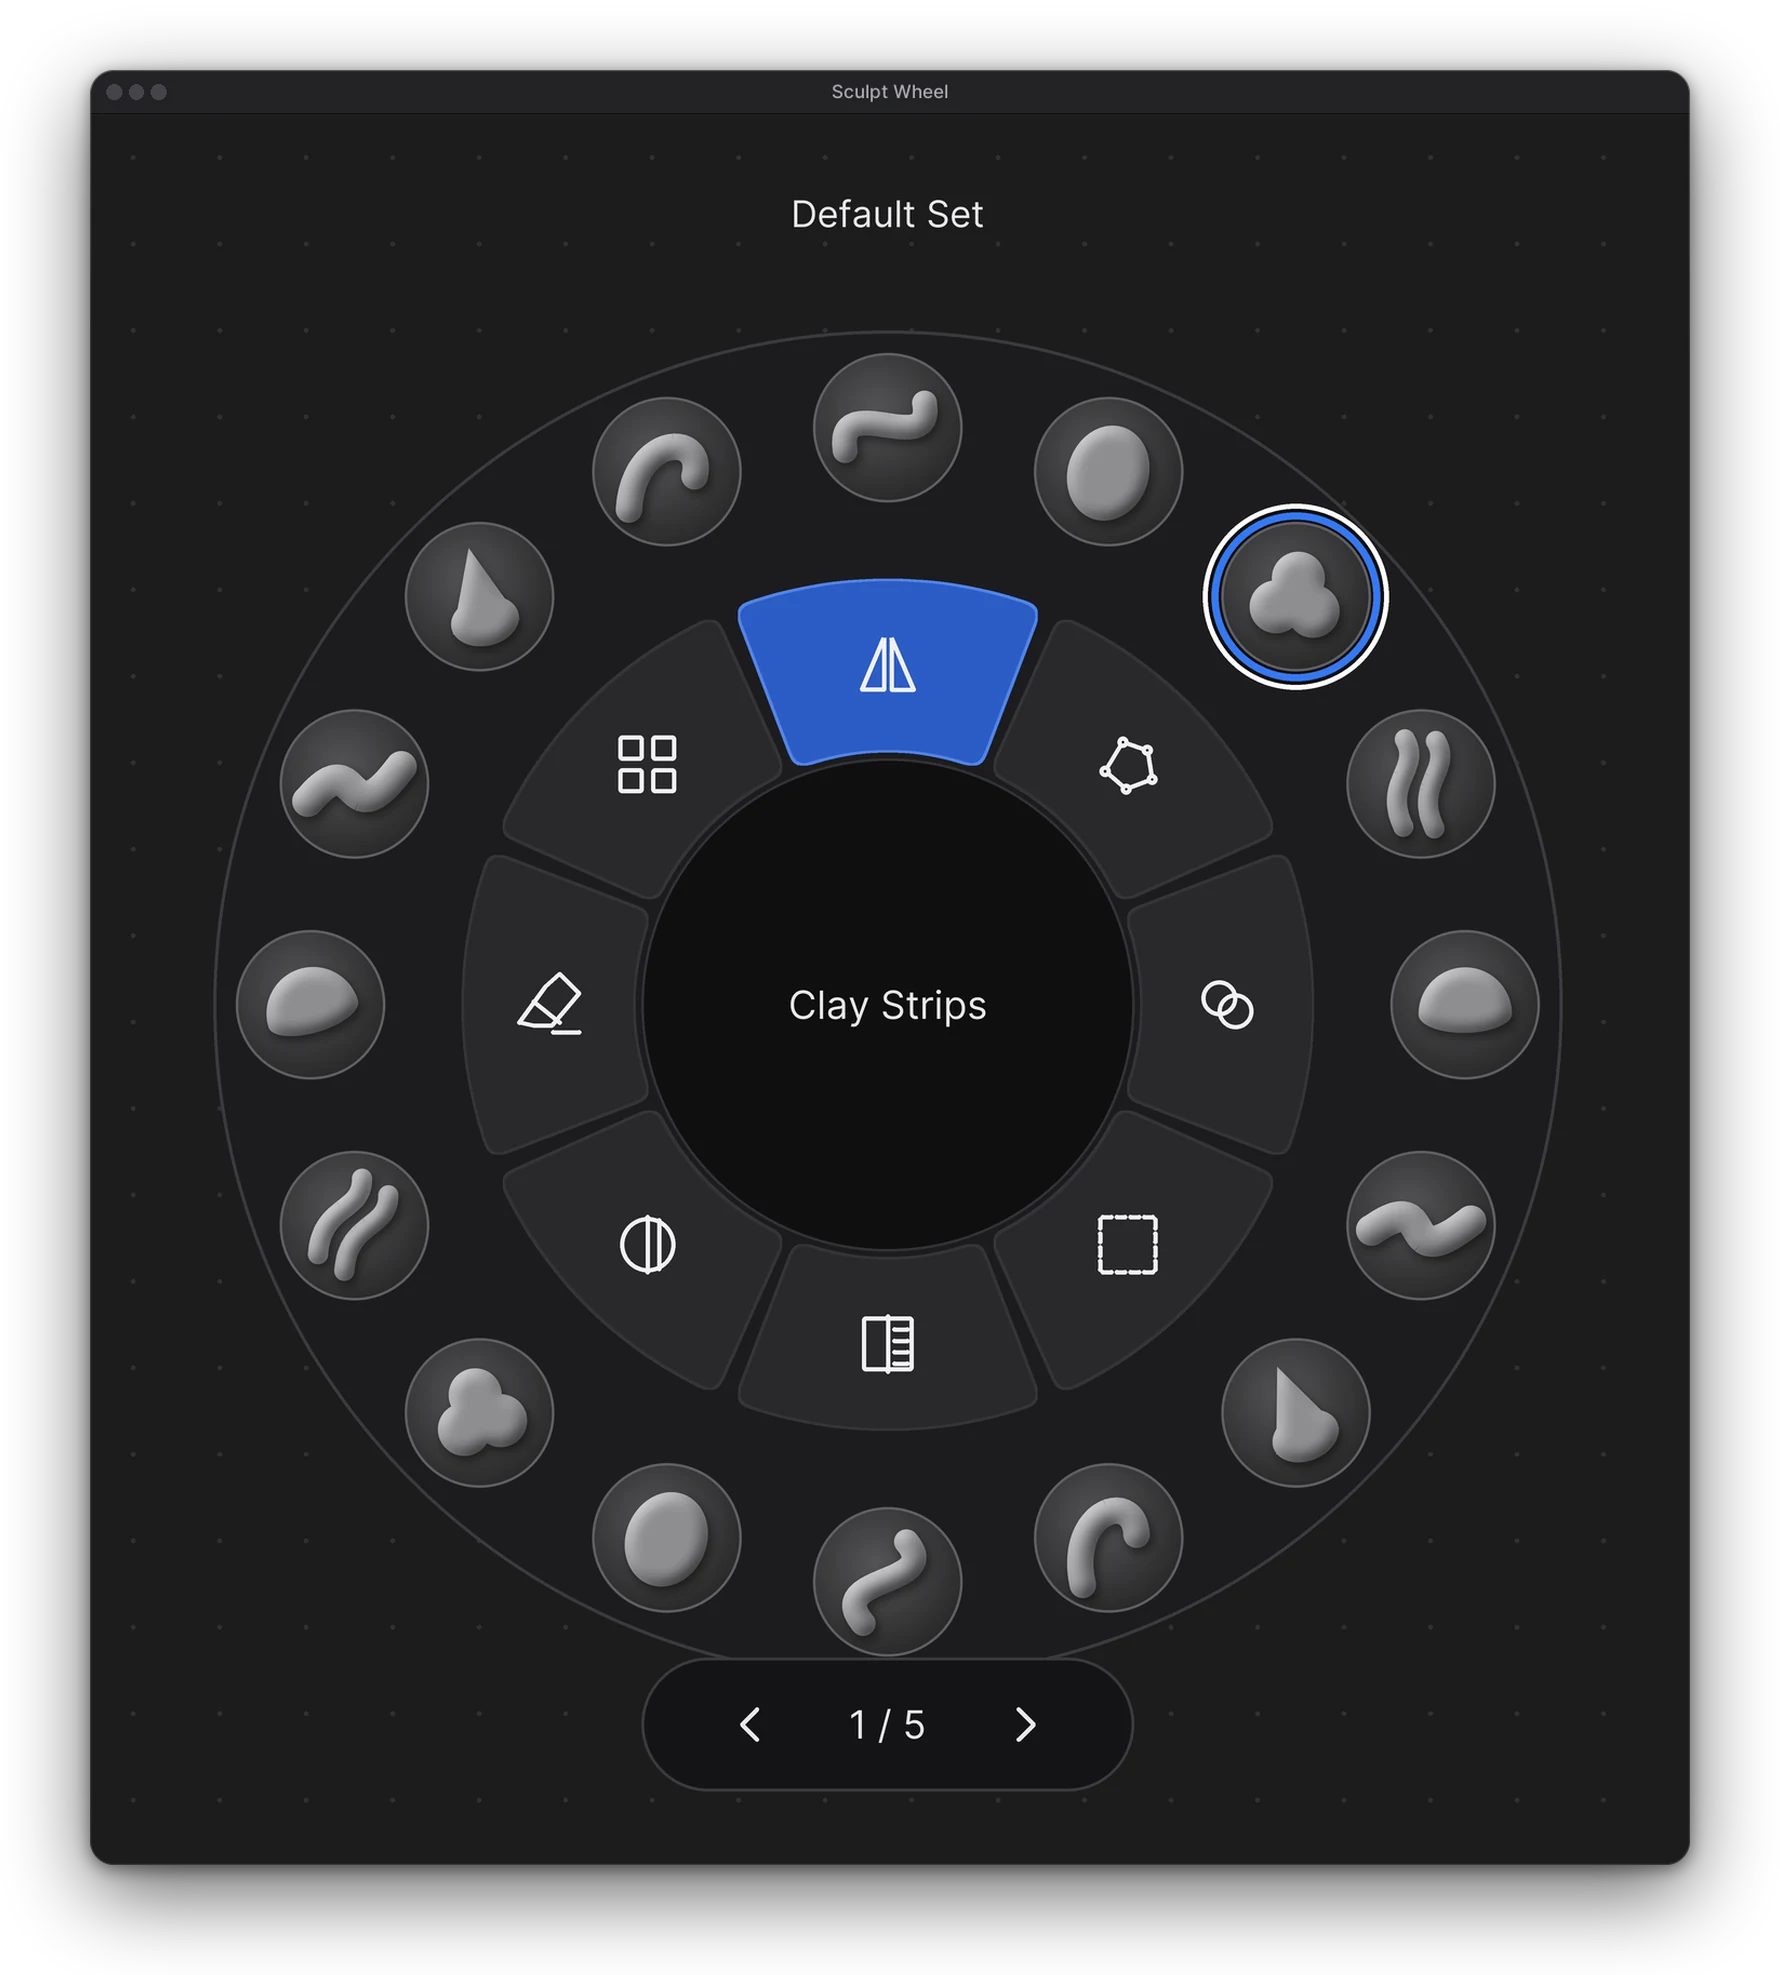
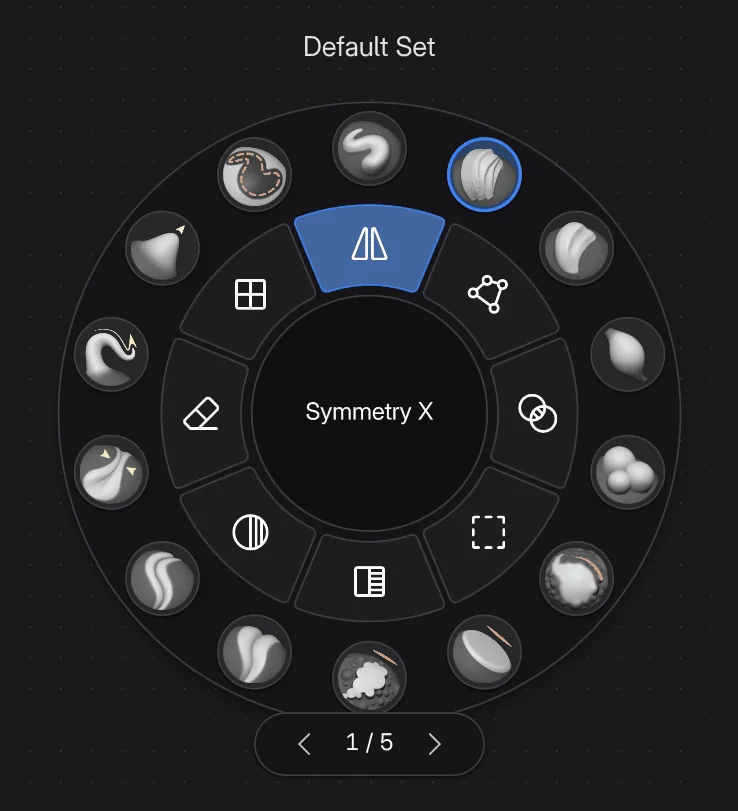
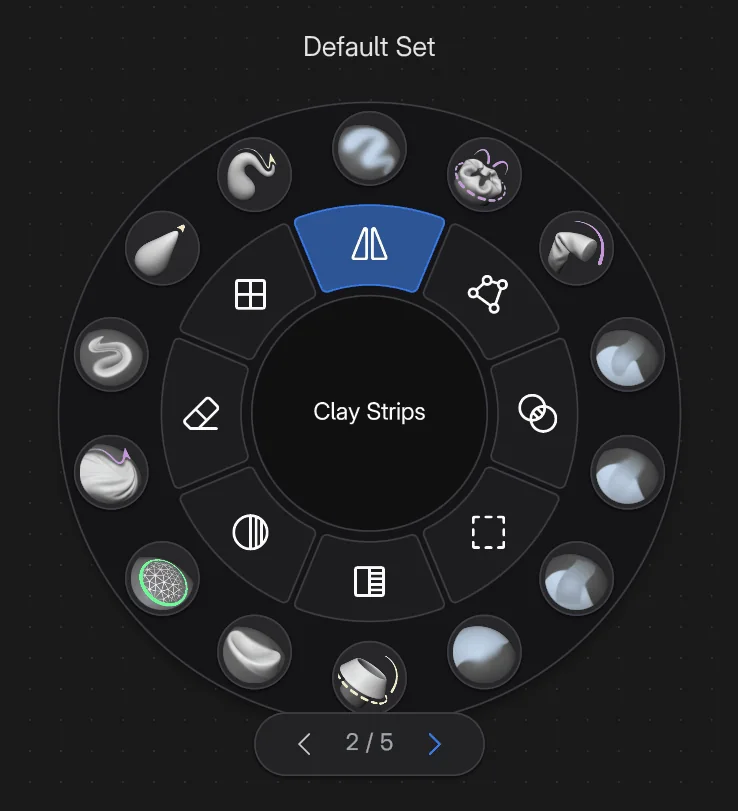
The outer ring holds brushes, the inner ring holds toggles and operators, and the core names the item under the mouse or the active brush. It is not a pie menu that opens and closes: it stays put.

  • Fill it with every Essentials brush of the page's mode in one click
  • Pages for more brushes; the inner ring stays the same
  • Presets: symmetry, automasking, mask and face sets, Dyntopo, Voxel Remesh, undo and redo
  • Disabled When per item: Voxel Remesh greys out while Dyntopo is on
A Ring Menu: sculpt brushes in the outer ring, toggles in the inner ring, Clay Strips named in the core, page 1 of 5.

In Blender

Recording
A Ring Menu for sculpting. Hover the ring to see each brush, click one to use it, sculpt, flip pages and switch symmetry from the inner ring.
The inner ring holds toggles and operators: symmetry, automasking, Dyntopo, masks.Screenshot
Ring Menu toggles. The inner ring holds toggles and operators: symmetry, automasking, Dyntopo, masks.
More brushes than fit? Pages: the tab under the ring flips them.Screenshot
Ring Menu pages. More brushes than fit? Pages: the tab under the ring flips them.
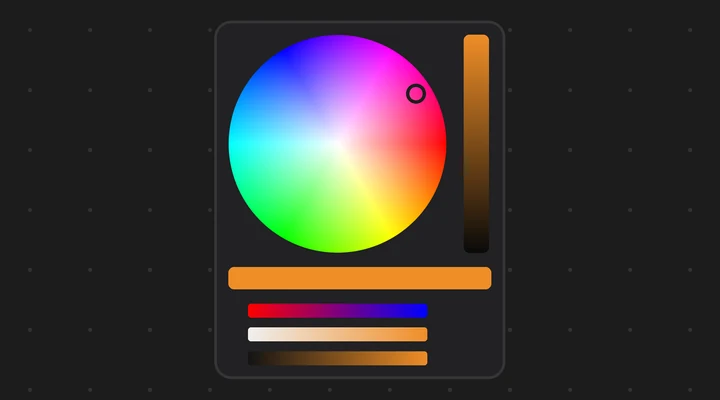
A Color Picker: hue and saturation wheel, brightness bar, swatch strip and sliders.

Color Picker

Edits a colour on the canvas: a Wheel, or a Ring + Square. Bright (HDR) colours above 1 are kept. Esc during a drag puts the colour back.

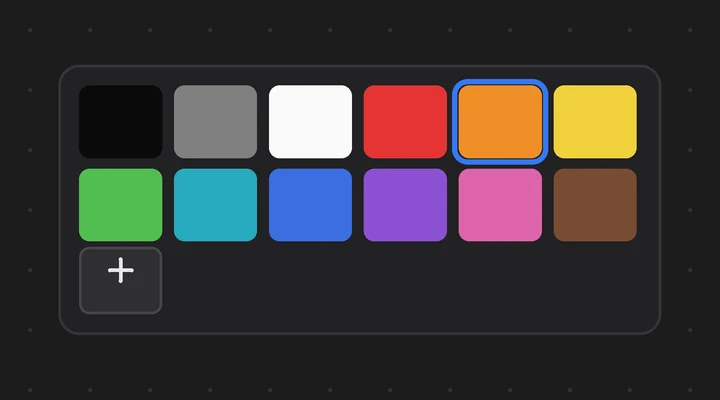
A Color Palette of twelve swatches, the orange one active, and a plus button.

Color Palette

Click a swatch and the property gets that colour. Its own colours, or a Blender palette shared with Texture Paint.

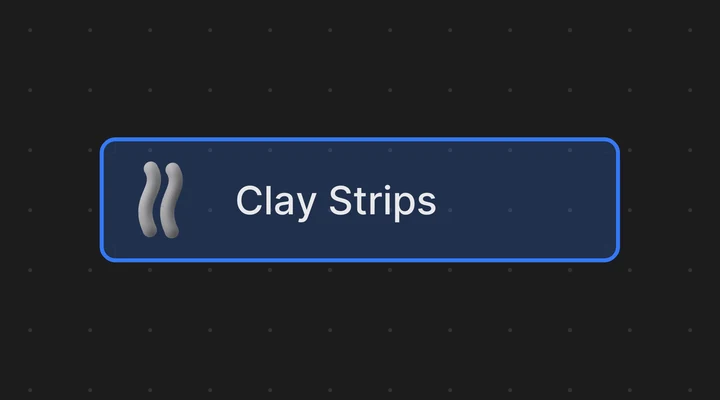
A Brush Picker for the Clay Strips brush, active.

Brush Picker

One click makes a brush active, in Sculpt, the paint modes, Sculpt Curves and the Grease Pencil modes. Previews come straight from the asset file.

In Blender

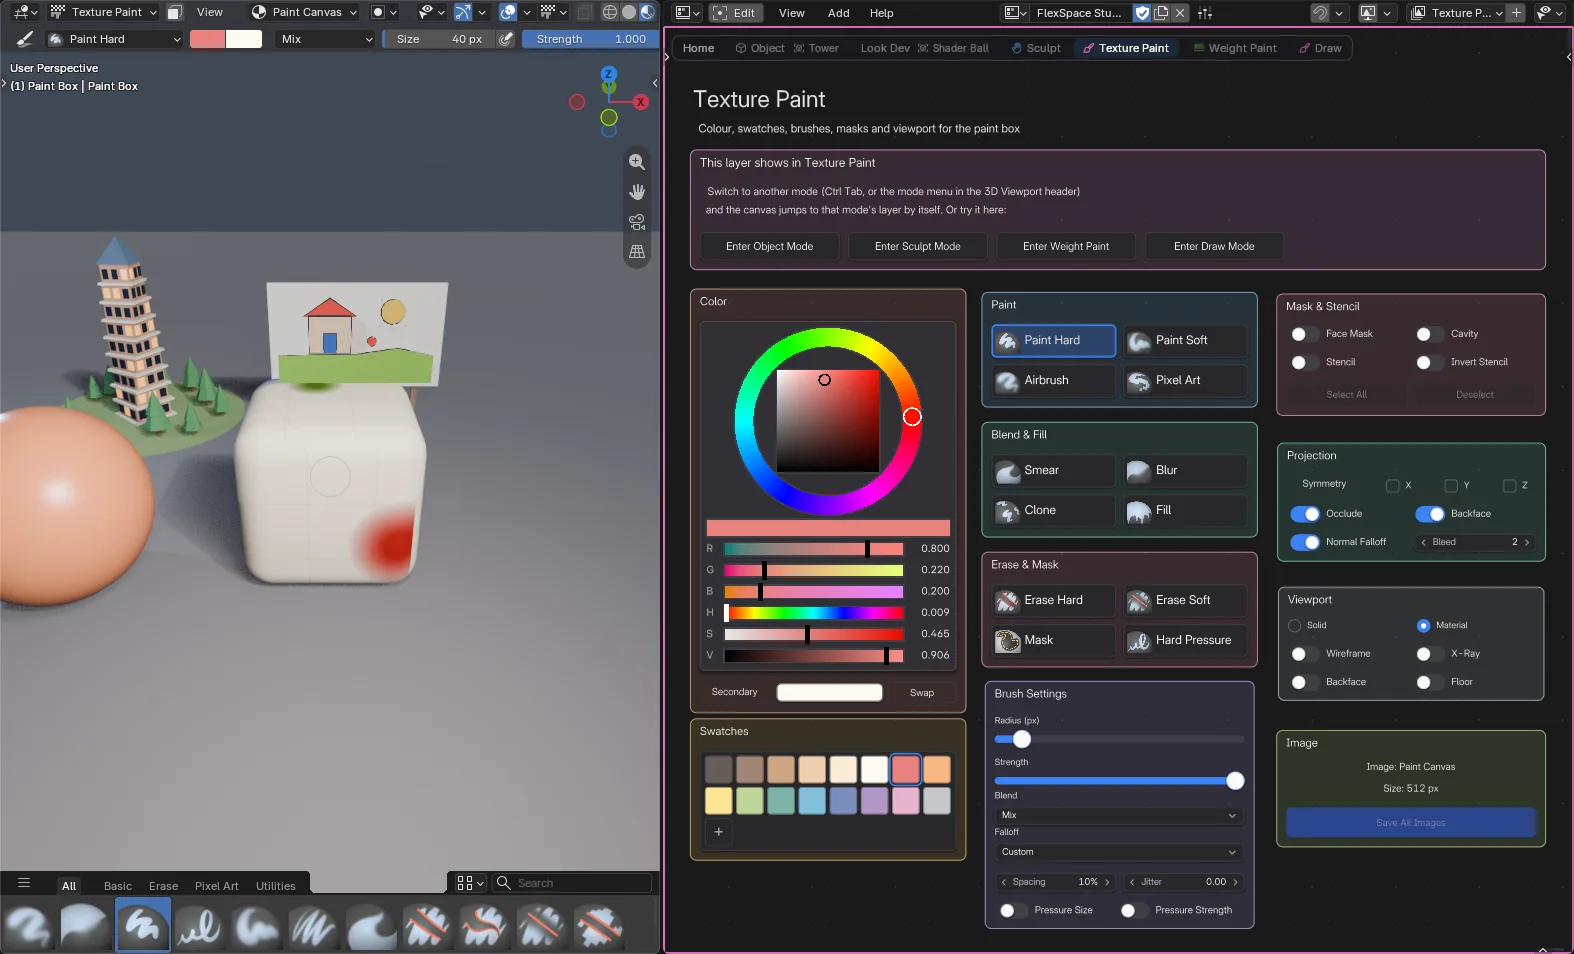
In Texture Paint the canvas shows a colour picker, swatches, paint brushes, masks and projection settings.Screenshot
FlexSpace Studio: Texture Paint page. In Texture Paint the canvas shows a colour picker, swatches, paint brushes, masks and projection settings.
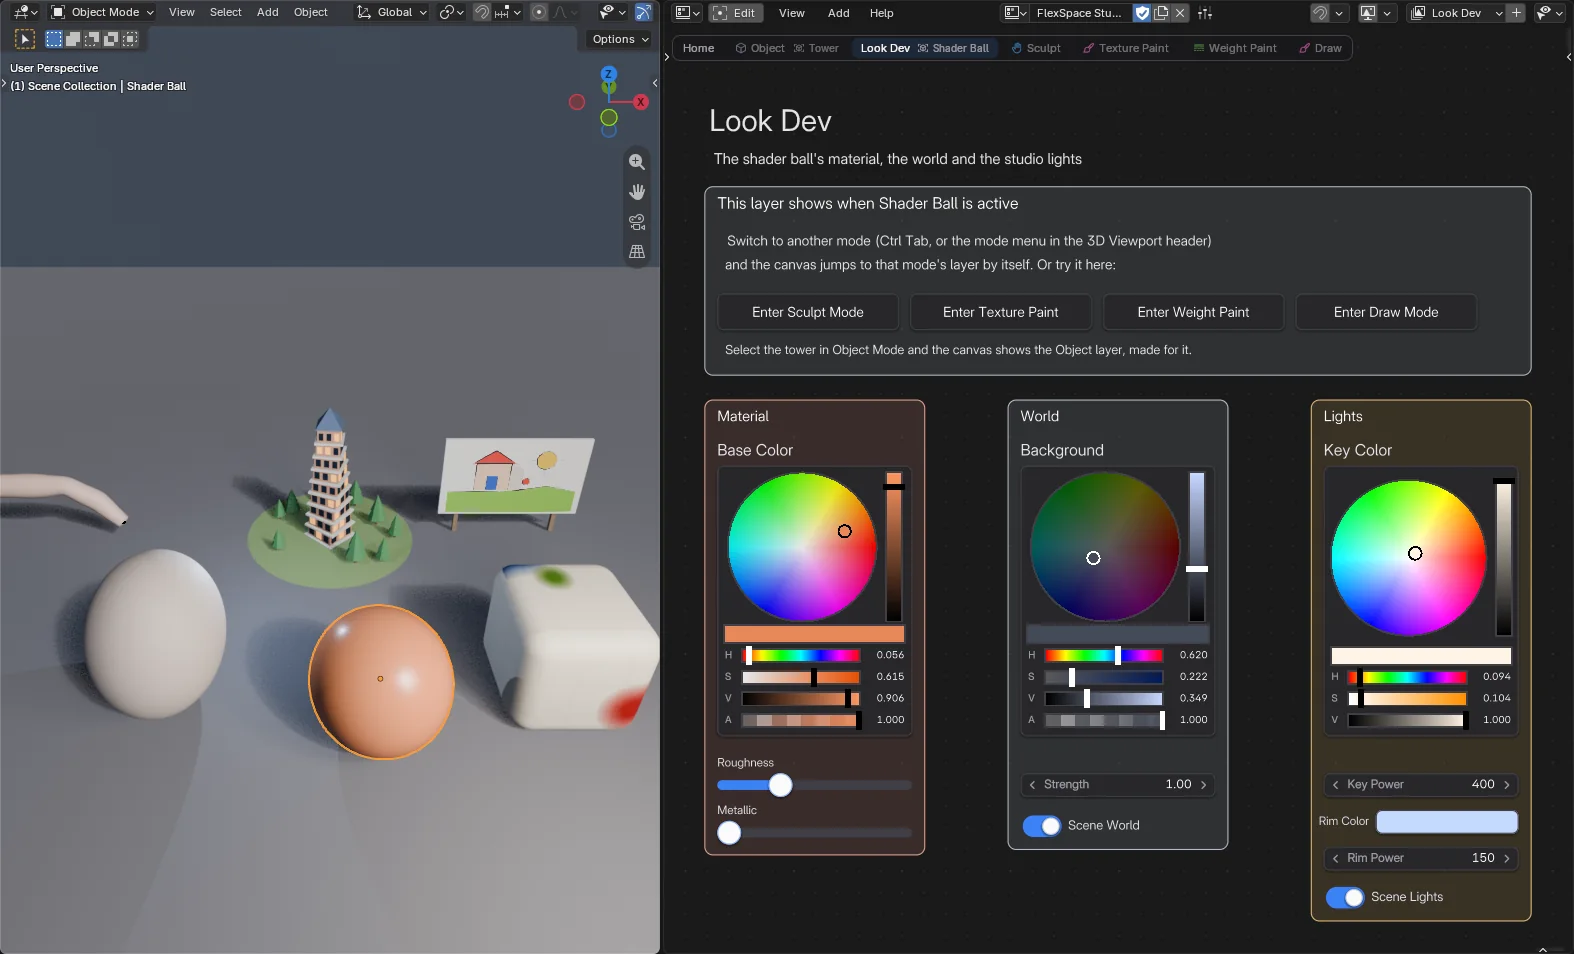
Click the shader ball and its Look Dev page goes live: colour pickers for the material, the world and the key light.Screenshot
FlexSpace Studio: Look Dev page. Click the shader ball and its Look Dev page goes live: colour pickers for the material, the world and the key light.
07

3D Views

View Preview

A live 3D view on your canvas.

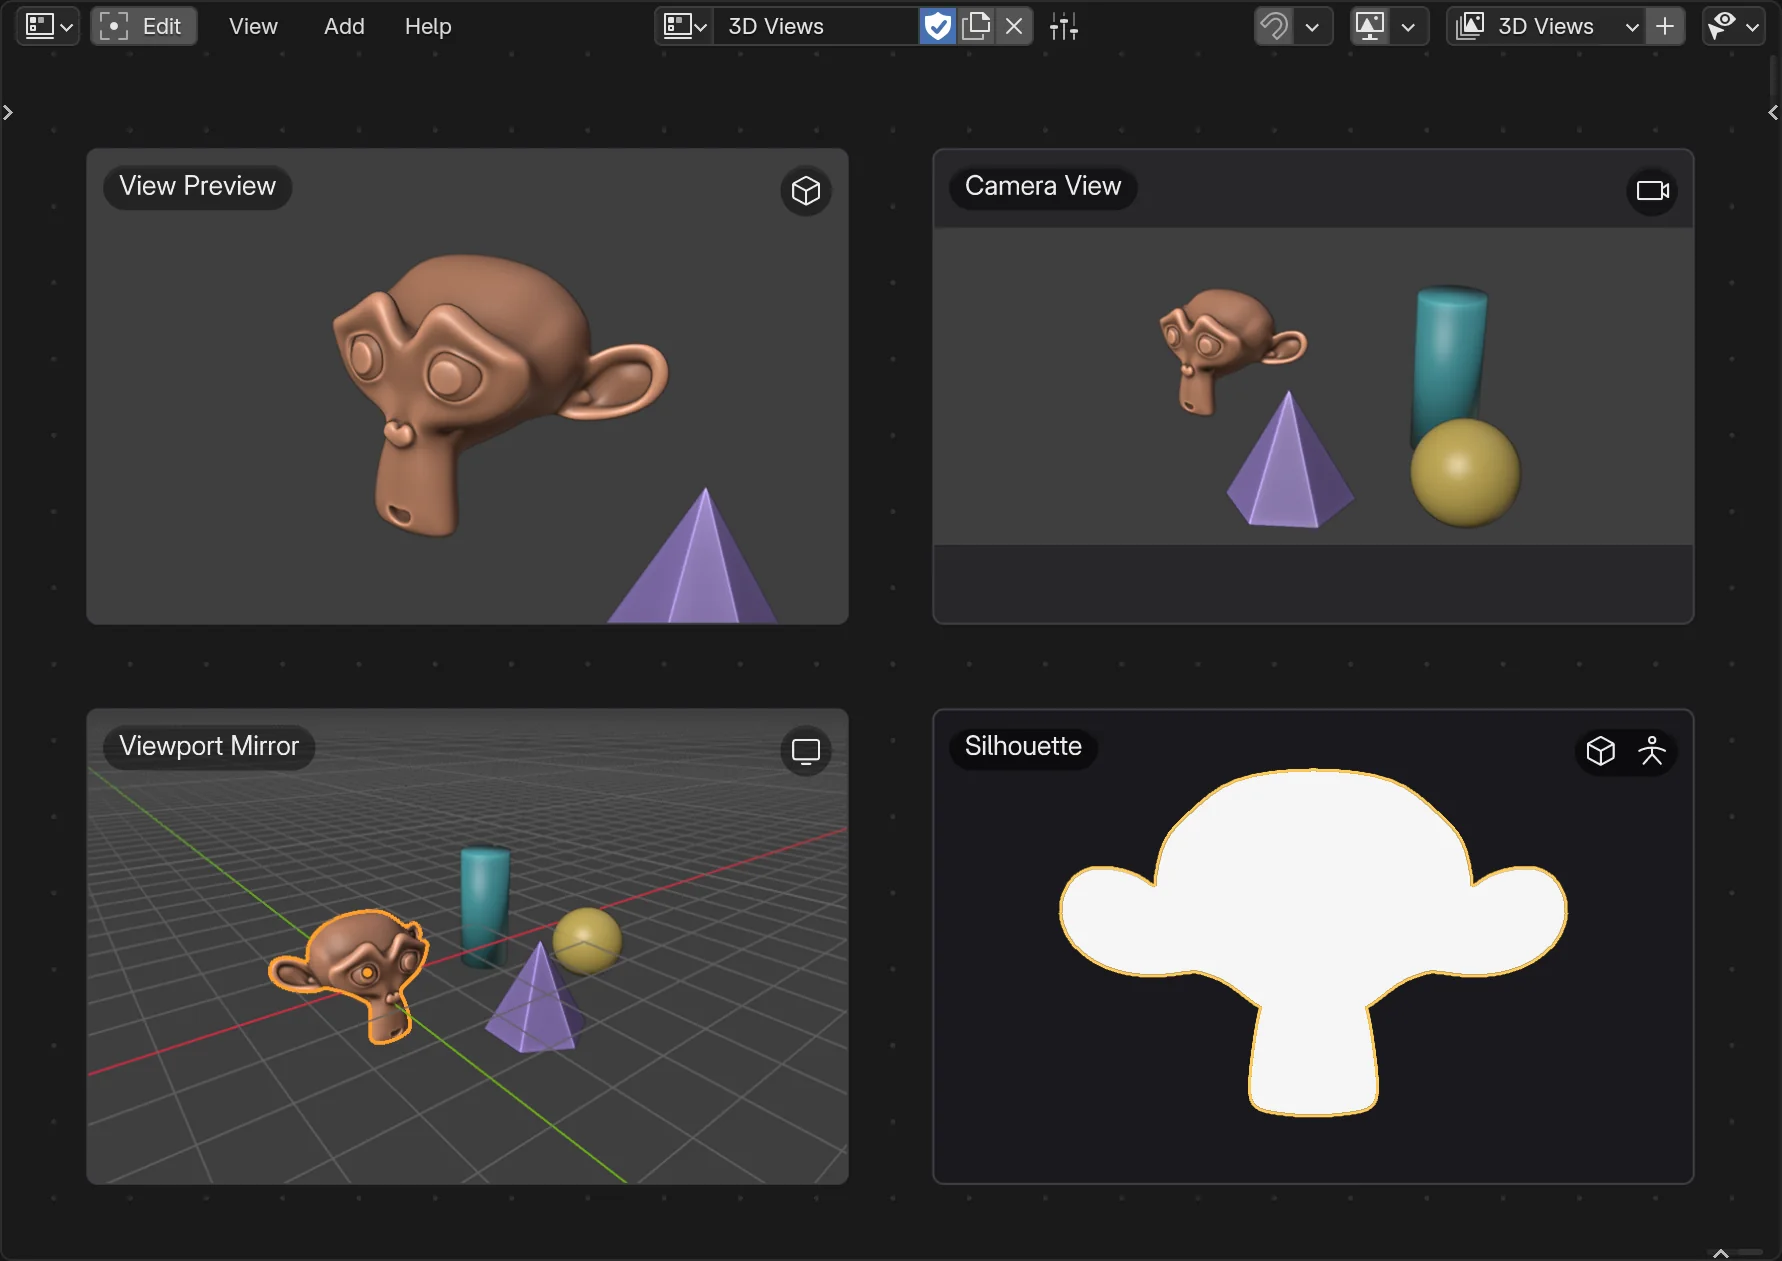
A close-up of the object you are working on, what the camera sees, or a second look at your viewport, next to the controls that change it. It updates as you work. Add > Graphics > 3D Views has four ready-made entries: one widget, set up four ways, and you can change any of them later.

  • Target frames objects and keeps them framed when they move or change
  • Camera shows a camera's frame at the render's aspect ratio
  • Navigate follows a 3D Viewport, or orbits on its own
  • Solid, Wireframe, Material Preview or the viewport's own shading, overlays if you like

It draws again only when something it shows changes; off screen, it draws nothing.

View Preview, Camera View, Viewport Mirror and Silhouette on one canvas, each a ready-made entry of the Add menu.Screenshot
The four 3D views. View Preview, Camera View, Viewport Mirror and Silhouette on one canvas, each a ready-made entry of the Add menu.

In Blender

Recording
Four live 3D views on one canvas. View Preview, Camera View, Viewport Mirror and Silhouette next to the 3D Viewport. Orbit the viewport and the mirror follows; click the ball and the preview and the silhouette frame it.
Recording
A close-up of the active object. View Preview frames the active object: click another object in the viewport and it frames that one.
Recording
What the camera sees. Camera View shows the scene camera's frame, with bars around it, while the camera swings round the props.
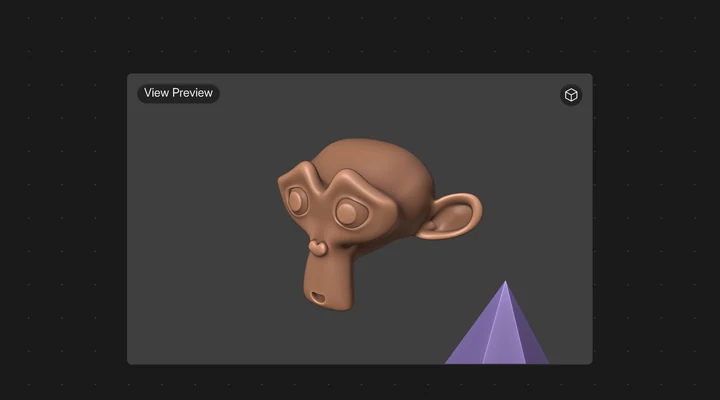
View Preview framing the active object, Suzanne.

View Preview

Frames the active object, the selected objects, an object or a collection, from any side or at an angle you set. Perspective or Orthographic, with Padding and Zoom.

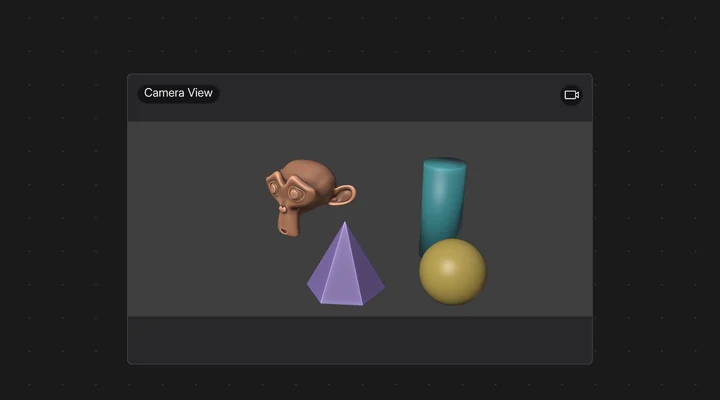
Camera View: the scene camera's 2.39 : 1 frame with bars above and below.

Camera View

What the scene camera sees (it follows camera markers), or a camera you pick. Passepartout darkens what is outside the frame; off, bars frame it.

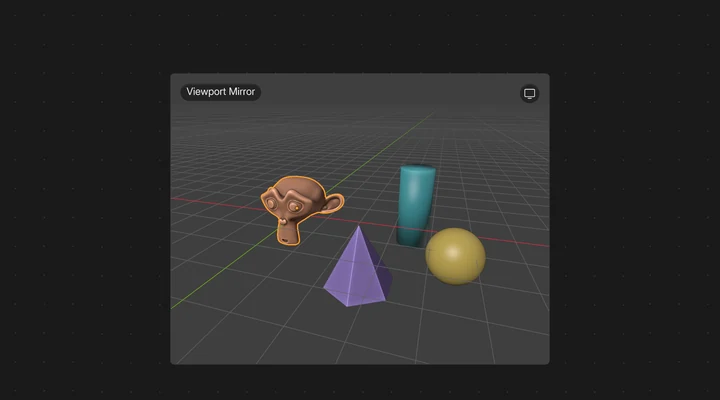
Viewport Mirror: the 3D Viewport's view, grid and outline included.

Viewport Mirror

Follows a 3D Viewport as you navigate, local view and clipping included. Or Free Orbit: a view of its own you orbit, pan and zoom in Live Mode.

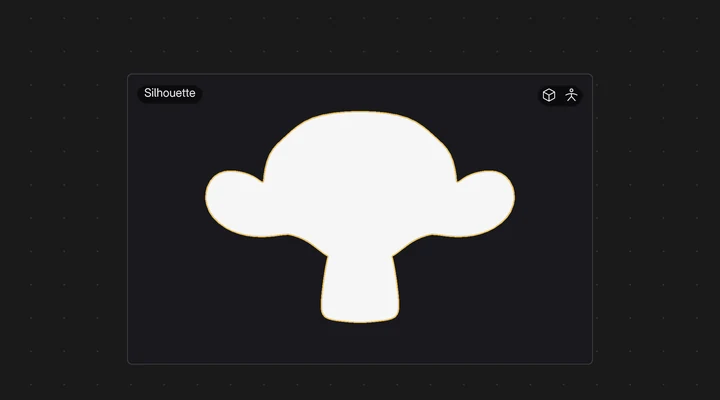
Silhouette: the active object as a flat white shape with an orange outline.

Silhouette

The flat shape, in one colour, as an artist checks a pose or a design. All Visible or Target Only, an outer or inner outline. Changing its colours is instant.

In Blender

Recording
A second look at your viewport. Viewport Mirror follows the 3D Viewport: orbit it one way, then the other, and the mirror moves with it.
Recording
Check the shape, not the shading. Silhouette draws the target as one flat shape with an outline. A Toggle bound to its Silhouette switch shows the shaded view and back; then Suzanne turns and the shape follows.
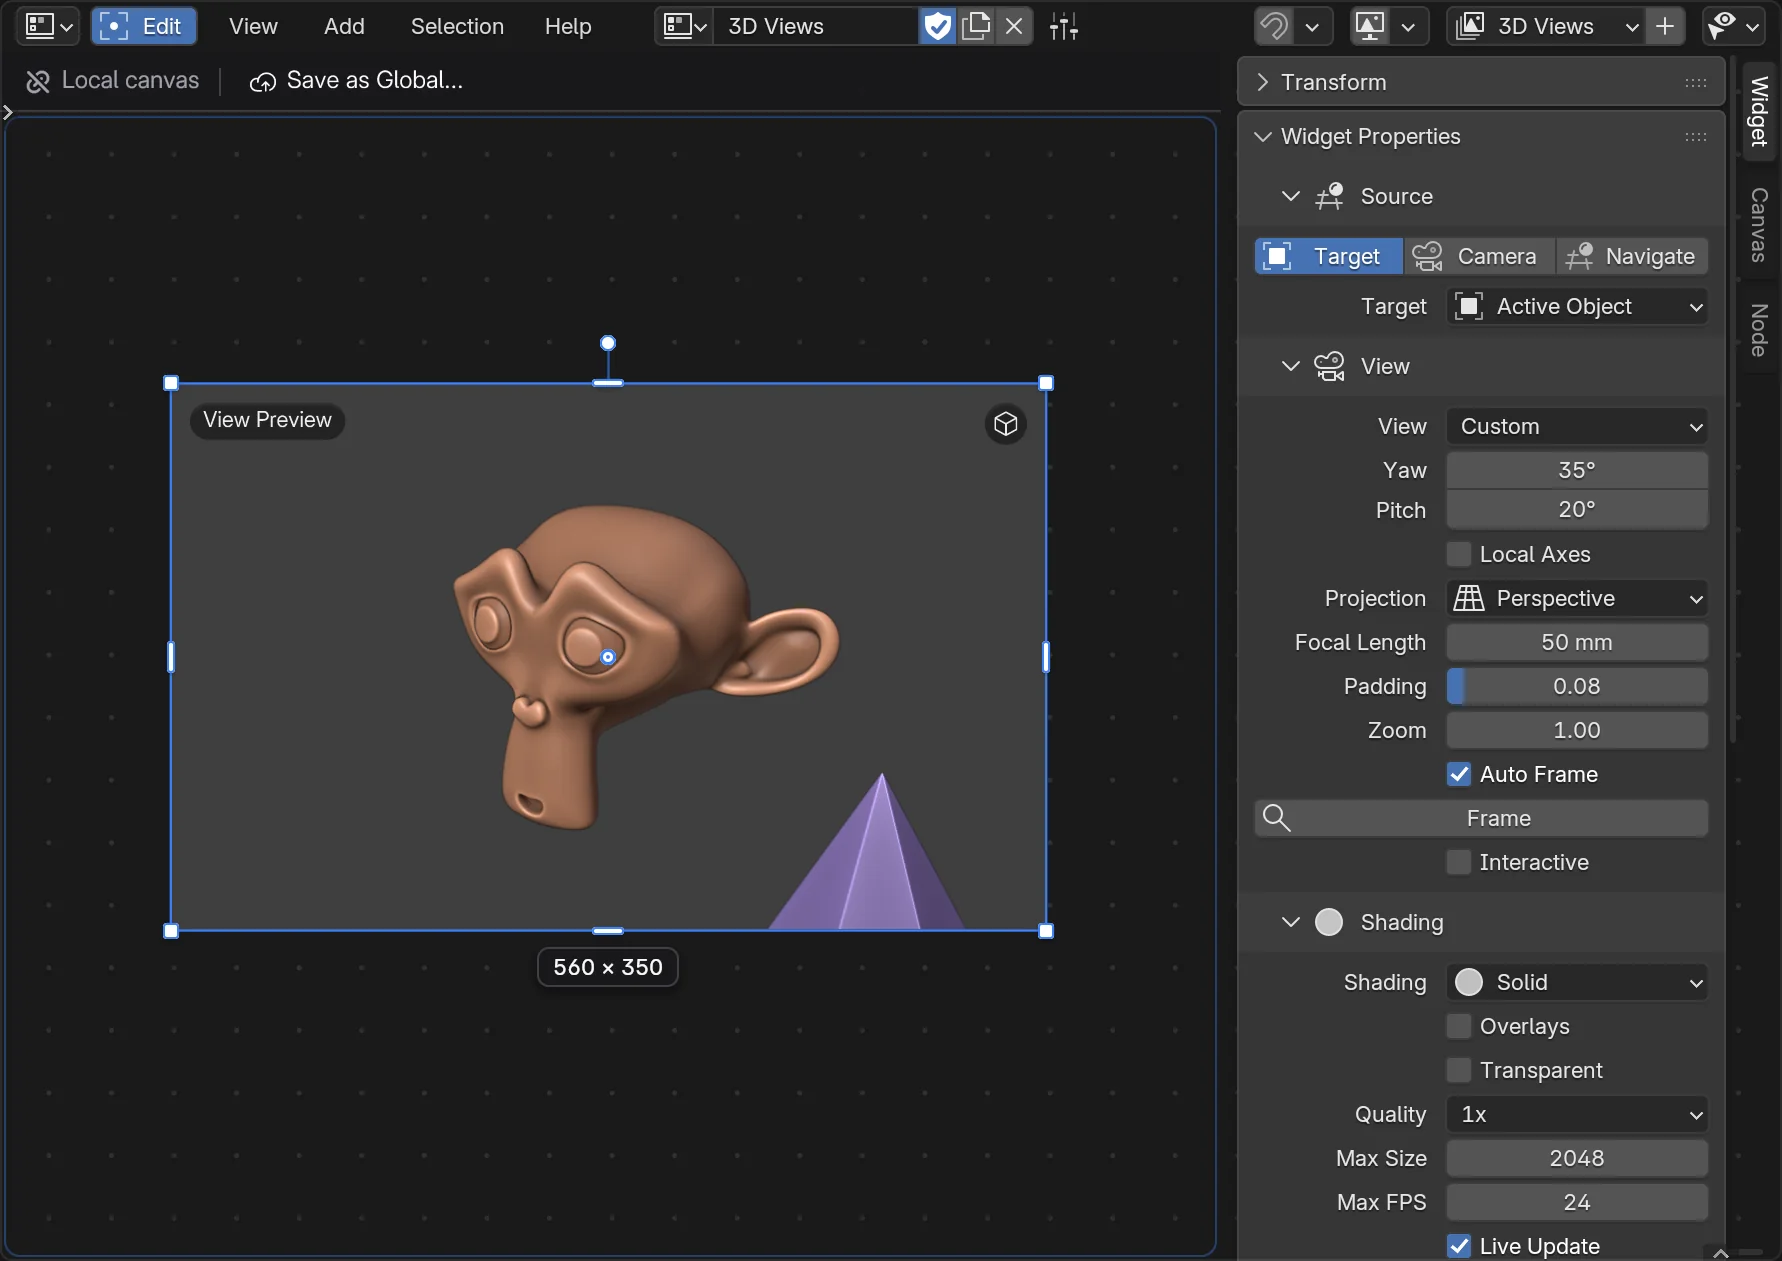
Edit Mode, the sidebar's Widget tab: the Source (Target, Camera, Navigate), the View and the Shading.Screenshot
View Preview settings. Edit Mode, the sidebar's Widget tab: the Source (Target, Camera, Navigate), the View and the Shading.
08

Presets, sharing and demos

Global presets

Build it once. Use it in every project.

A global preset is a canvas saved outside the .blend file, in the add-on's user folder, so it survives add-on updates. A canvas added from it stays linked: it knows which version it came from, and your edits stay in this file until you choose to send them.

  • Overwrite sends your canvas to the preset; Sync takes the preset's
  • Restore Previous Version: the last 5 versions
  • Unchanged linked canvases update when a file opens
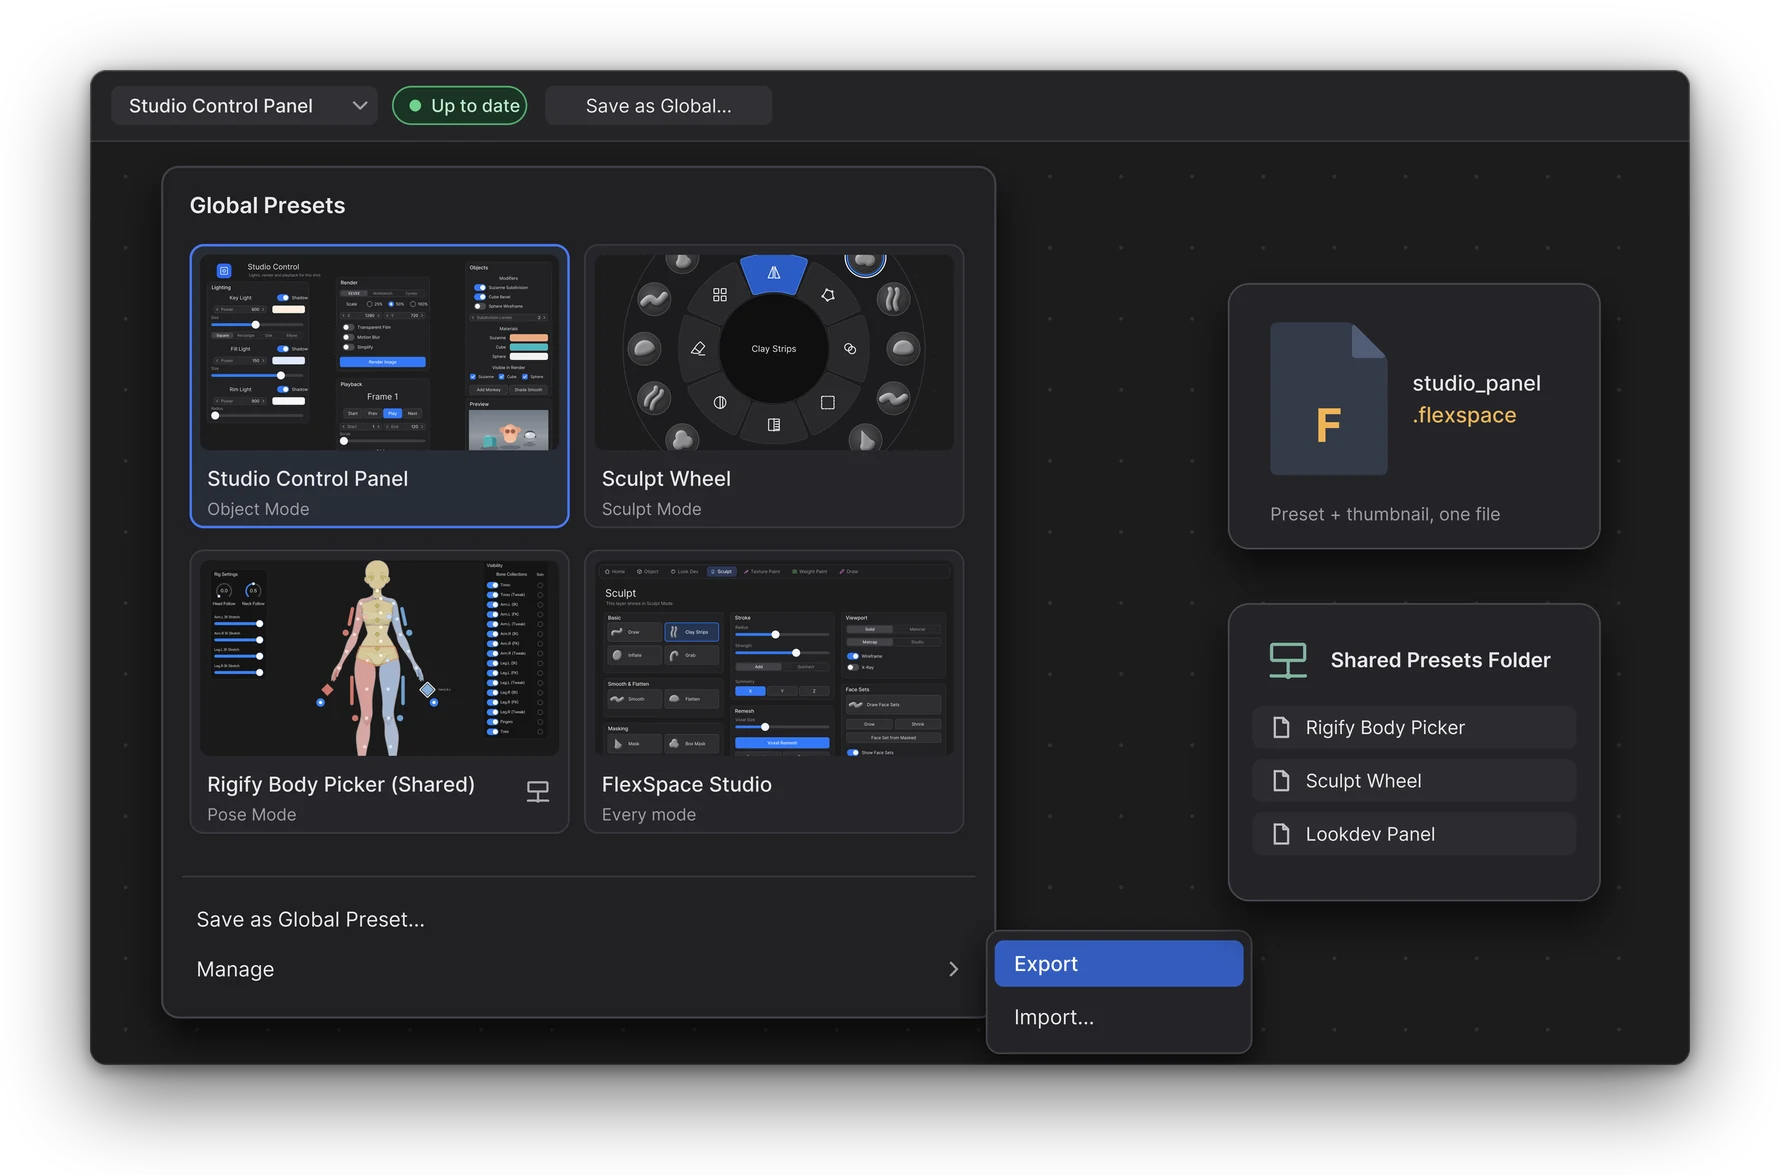
The Global Presets menu: four presets as thumbnails, one from the shared folder, with Save as Global Preset and Manage.

In Blender

Save any canvas as a global preset and add it to any project from a menu of thumbnails.Screenshot
Global presets. Save any canvas as a global preset and add it to any project from a menu of thumbnails.
A canvas linked to a global preset: the top bar shows its name and that it is up to date.Screenshot
Global presets. A canvas linked to a global preset: the top bar shows its name and that it is up to date.
The Canvas tab of the sidebar: the pages and the Library of global presets and local canvases.Screenshot
Library. The Canvas tab of the sidebar: the pages and the Library of global presets and local canvases.
The badges of a linked canvas on the top bar
BadgeMeaning
✓ Up to dateSame as the preset.
● ModifiedYou changed the canvas. The preset is unchanged.
↓ vN availableAnother project overwrote the preset: version N is newer.
⚠ MissingThe preset's files are not on this computer. The canvas keeps working from its own copy.

.flexspace files

Manage > Export writes one .flexspace file with the preset and its thumbnail. Manage > Import... checks the file first and keeps the preset's identity.

Shared presets folder

Point everyone at one folder, for example on a network drive. It is read in the background, so a slow or offline drive never freezes Blender.

The Library

The Canvas tab of the sidebar lists every global preset and every local canvas. Click one to add it or show it.

Demo files

Open a demo, take it apart.

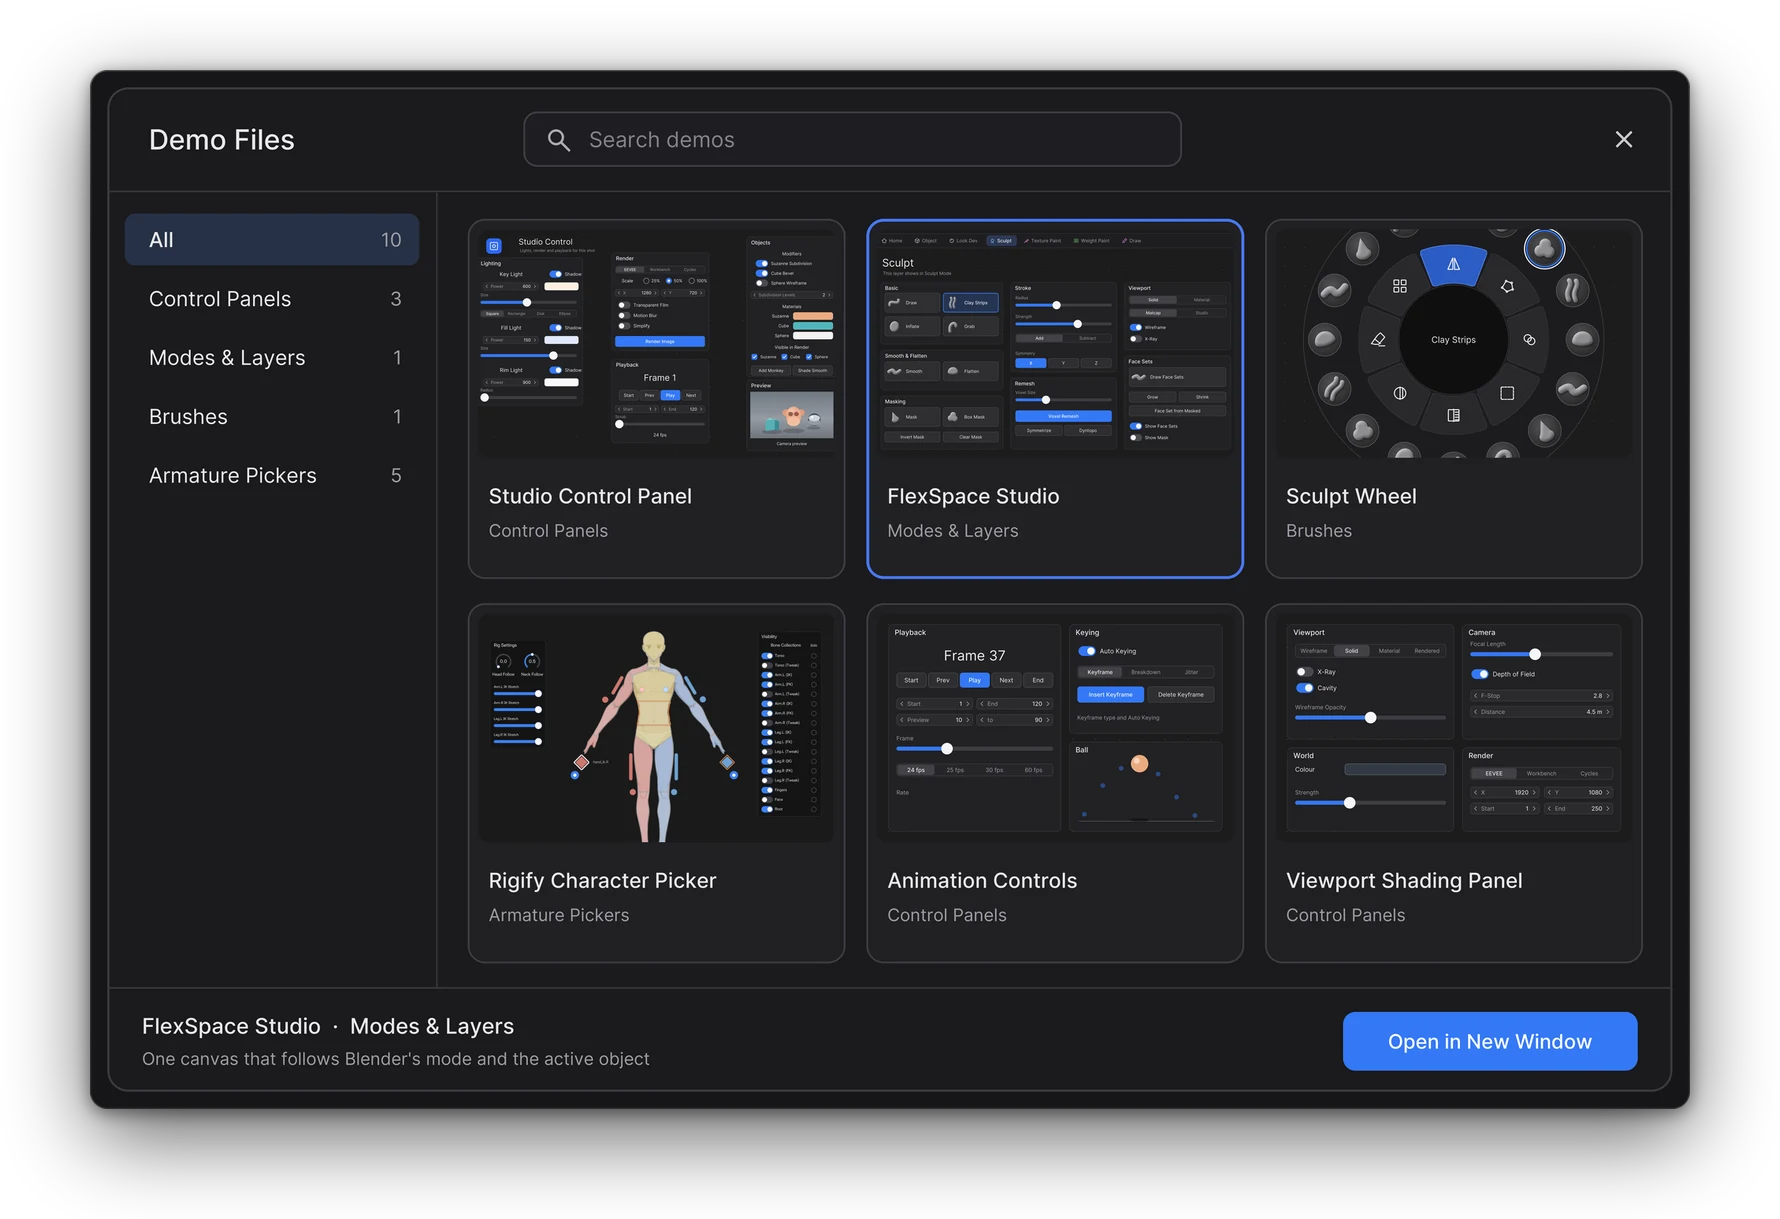
Eleven finished scenes: Studio Control Panel, Viewport Shading Panel, Animation Controls, FlexSpace Studio, Sculpt Wheel, City Builder (a city of six Geometry Nodes systems, shaped from one canvas page), and five armature pickers. A demo opens in another Blender window, as a copy: your file is never touched.

  • Help > Demo Files, or Open a Demo on an empty editor
  • Type to search, double-click or Enter to open
  • File > Save As to keep the copy
The demo browser: categories, demo cards and Open in New Window.

In Blender

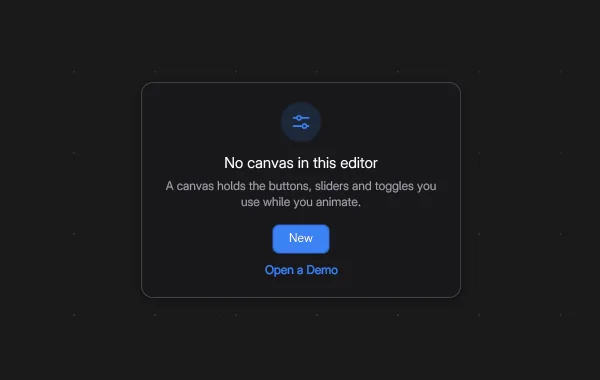
No canvas yet? One click makes one, or open a finished demo to see how it is built.Screenshot
Get started. No canvas yet? One click makes one, or open a finished demo to see how it is built.
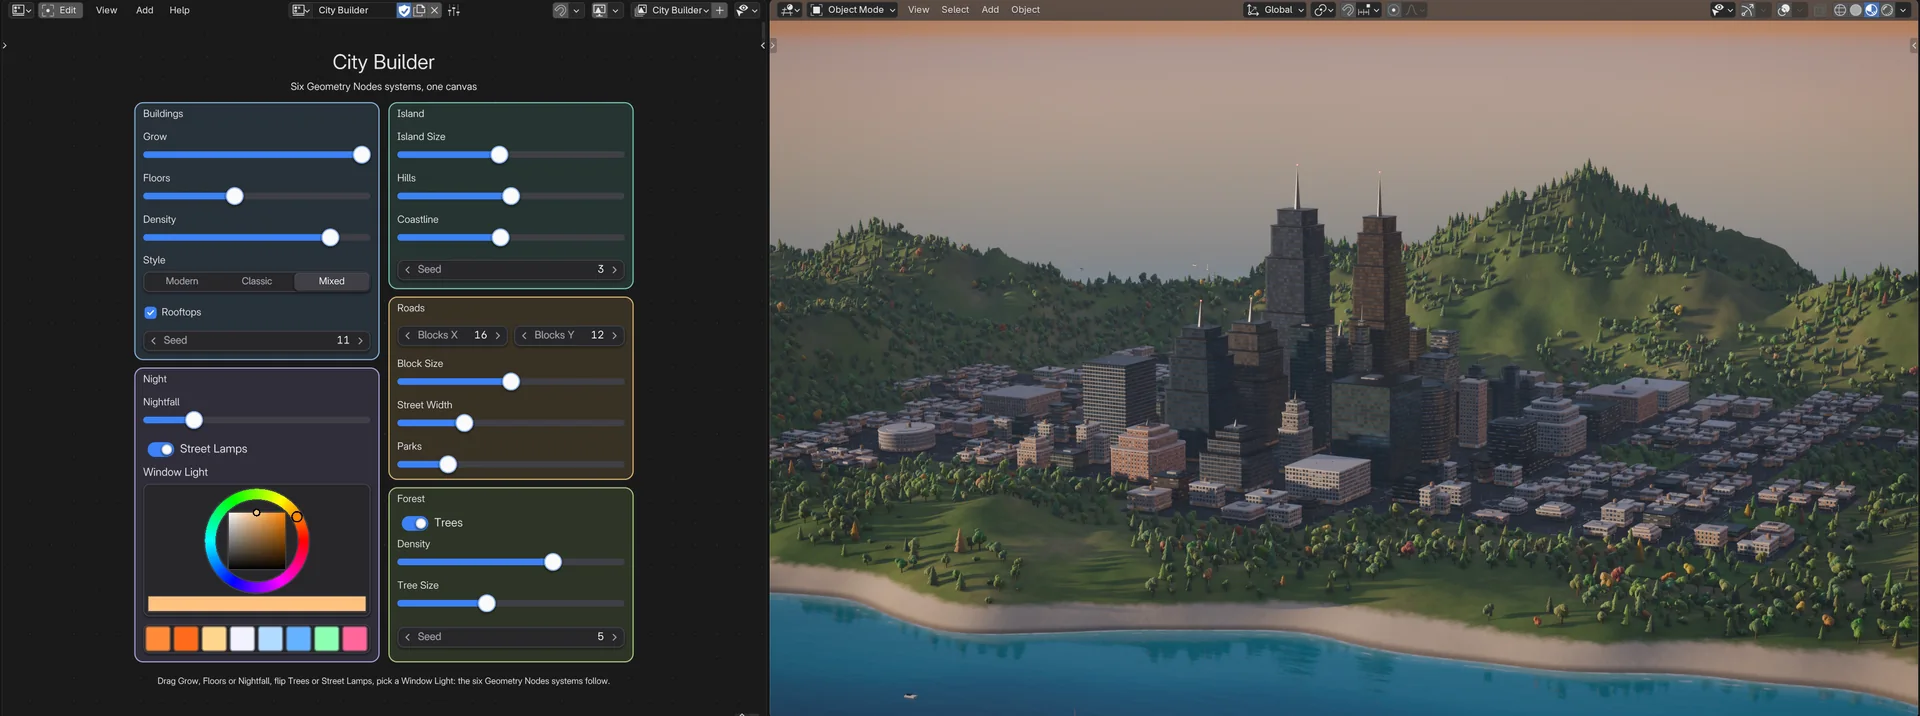
The City Builder demo as it opens: one canvas page drives the island, the streets, the buildings, the forest and the night lights, next to the island city at golden hour.Screenshot
City Builder. The City Builder demo as it opens: one canvas page drives the island, the streets, the buildings, the forest and the night lights, next to the island city at golden hour.
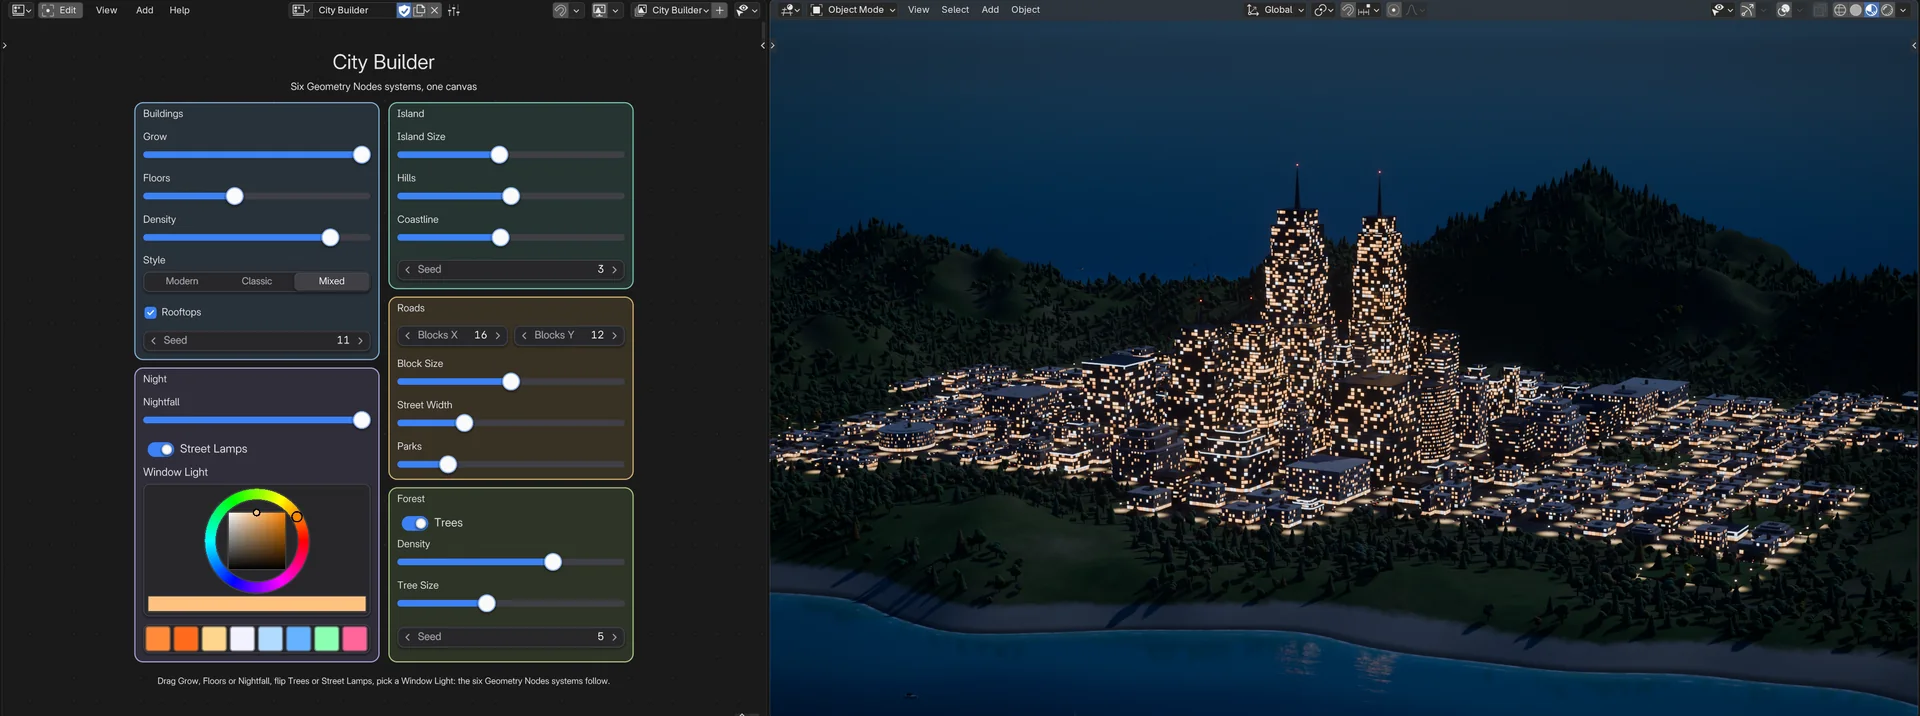
Nightfall dragged to the end: the sun has set, the windows and the street lamps are lit and the sky is night.Screenshot
City Builder at night. Nightfall dragged to the end: the sun has set, the windows and the street lamps are lit and the sky is night.
09

Armature Picker

A canvas of buttons that select the bones of your rig, saved with the armature data. Click to select, Shift click to add, drag to box select, right-click for the Insert Keyframe pie. Your Pose Mode keys work as in the 3D Viewport.

  • Humanoid Body (Rigify) in one step: body, hands, feet and face
  • IK/FK pucks, knobs, 2D pads and a gaze control
  • Mirroring across the centre line while you lay it out
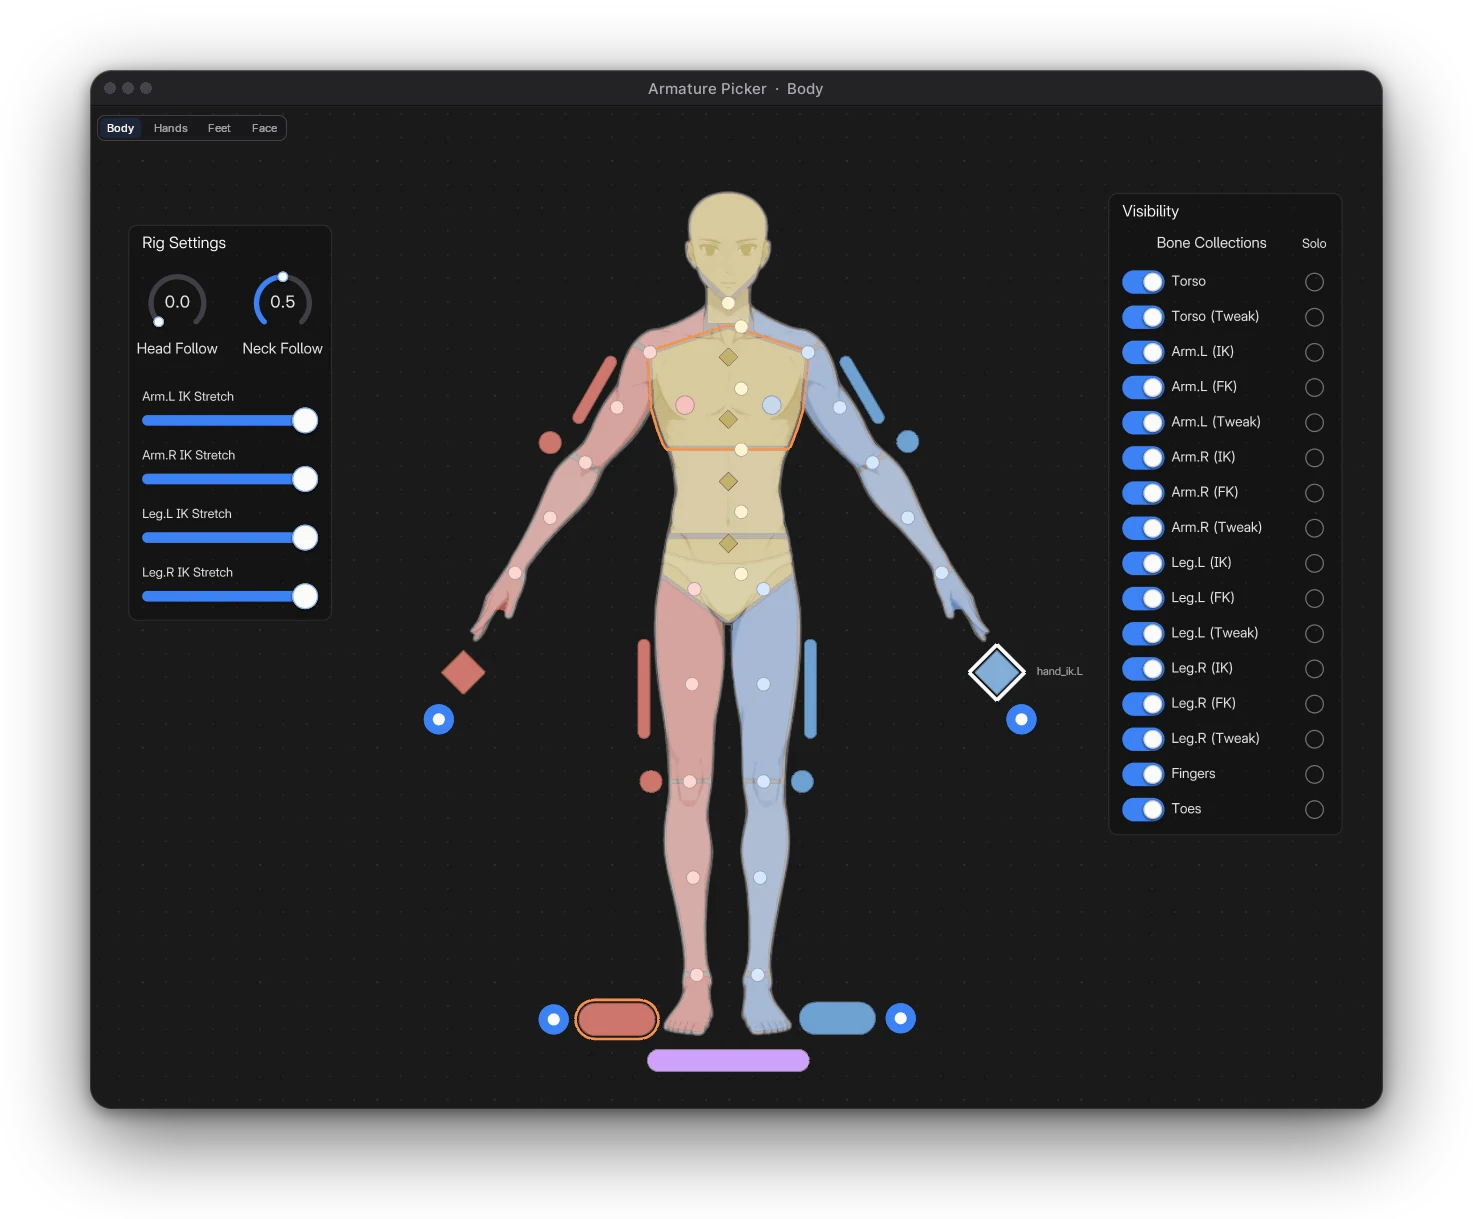
The Body page of the Armature Picker over the Adult Male art: the chest and the right foot picked, the IK hand hand_ik.L active and named, left blue, right red, centre yellow, root purple.

In Blender

Recording
Click in the picker, pose in the viewport. With the rig's controls hidden, click a body part in the picker, then move or rotate it with G or R in the viewport: the arm, the head and the spine.
Recording
Aim the eyes, then shape the face. Drag the gaze pad and the character's eyeballs follow; then pick the brows and the mouth corners on the face chart and move them for a smile, no controls cluttering the face.
Recording
Curl a hand in one move. Shift-click the four finger masters in the picker and curl them together in the viewport (R, X X), then the thumb.
10

Details

Themes

One theme for every widget.

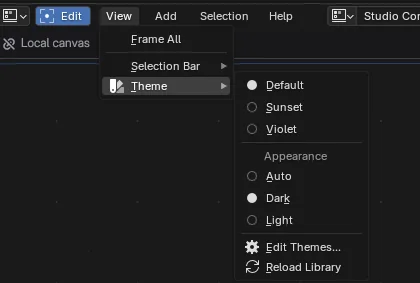
Pick a theme from View > Theme. Appearance follows Blender's theme (Auto), or stays Dark or Light. Make your own in Edit Themes...: your themes are files in the theme library folder, so they survive updates.

  • Colours, shapes and type, on every canvas
  • Built-in themes have a lock; duplicate one to change it
  • Override Theme lets one widget keep its own look
The same Studio Control Panel with the Light appearance.
The Studio Control Panel with the Light appearance.

In Blender

Recording
Themes. One canvas through the Default theme, two user themes and the Light appearance.
Pick a theme and its appearance, Auto, Dark or Light, or open the theme editor, from the View menu.Screenshot
Themes and Appearance. Pick a theme and its appearance, Auto, Dark or Light, or open the theme editor, from the View menu.
The same canvas in a user theme, Sunset: made in the theme editor in a few clicks.Screenshot
Sunset theme. The same canvas in a user theme, Sunset: made in the theme editor in a few clicks.
The same canvas in a user theme, Violet: made in the theme editor in a few clicks.Screenshot
Violet theme. The same canvas in a user theme, Violet: made in the theme editor in a few clicks.
Every theme has a Dark and a Light mode; Auto follows Blender's own theme.Screenshot
Light appearance. Every theme has a Dark and a Light mode; Auto follows Blender's own theme.

Report a bug from Blender

Help > Report a Bug... fills in your Blender and FlexSpace versions, system, GPU and recent errors, then opens a GitHub issue in your browser for you to review. Nothing is sent by FlexSpace itself.

Docs inside Blender

The canvas header's Help menu holds the guide, the demo files and Report a Bug. The same guide is online.

Flex Space vs Armature Picker

The two canvases of FlexSpace compared
Flex SpaceArmature Picker
ForControl panels for any workflowPicking the bones of a rig while you pose
Saved inThe .blend file, as a canvas data-blockThe armature data: it travels with the rig, linked or appended
Using itLive ModeBlender's Pose Mode
PagesAlways, Mode, Object, or Object in ModeAlways in Pose Mode
Its own widgetsFlex Box, Brush PickerBone pickers, Bone Collection toggle, Radial and Lineal 2D sliders, IK/FK puck
Global presetsYesYes: a picker preset finds its bones by name
ExtrasEnter Mode buttons, pages per objectHumanoid Body (Rigify), mirror, Repair Bone Bindings, Import Geo Collection

Make Blender fit your hands.

Start with a demo, then build the panel your workflow deserves.